- Home
- Nutanix
- Nutanix Certified Professional (NCP)
- NCP-US-6.5
- NCP-US-6.5 - Nutanix Certified Professional - Unified Storage (NCP-US) v6.5
Nutanix NCP-US-6.5 Nutanix Certified Professional - Unified Storage (NCP-US) v6.5 Exam Practice Test
Nutanix Certified Professional - Unified Storage (NCP-US) v6.5 Questions and Answers
Which Nutanix Unified Storage capability allows for monitoring usage for all Files deployment globally?
Options:
File Analytics
Nutanix Cloud Manager
Files Manager
Data Lens
Answer:
DExplanation:
Data Lens is a feature that provides insights into the data stored in Files across multiple sites, including different geographical locations. Data Lens allows administrators to monitor usage, performance, capacity, and growth trends for all Files deployments globally. Data Lens also provides reports on file types, sizes, owners, permissions, and access patterns3. References: Nutanix Data Lens Administration Guide3
Which error logs should the administrator be reviewing to determine why the relates service is down?
Options:
Solver.log
Arithmos.ERROR
Cerebro.ERROR
Tcpkill.log
Answer:
CExplanation:
The error log that the administrator should review to determine why the relay service is down is Cerebro.ERROR. Cerebro is a service that runs on each FSVM and provides relay functionality for Data Lens. Relay service is responsible for collecting metadata and statistics from FSVMs and sending them to Data Lens via HTTPS. If Cerebro.ERROR log shows any errors or exceptions related to relay service, it can indicate that relay service is down or not functioning properly. References: Nutanix Files Administration Guide, page 23; Nutanix Data Lens User Guide
What is the binary image extension of File Analytics?
Options:
JSON
QCOW2
ISO
VMDK
Answer:
BExplanation:
File Analytics is deployed as a VM, and Nutanix provides its binary image in QCOW2 format for AHV, which is the primary hypervisor for Nutanix clusters. QCOW2 is the standard disk image format for AHV, making it the correct choice for the File Analytics deployment image.
Exact Extract from Nutanix Documentation:
From the Nutanix File Analytics Deployment Guide (available on the Nutanix Portal):
“The File Analytics VM is provided as a binary image in QCOW2 format for deployment on AHV clusters. To deploy File Analytics, download the QCOW2 image from the Nutanix Portal and import it into the cluster using Prism Central or Prism Element.”
An administrator has performed an upgrade to Files. After upgrading, the file server cannot reach the given domain name with the specified DNS server list.
Which two steps should the administrator perform to resolve the connectivity issues with the domain controller servers? (Choose two.)
Options:
Verify the DNS settings in Prism Element.
DNS entries for the given domain name.
Verify the DNS settings in Prism Central.
DNS server addresses of the domain controllers.
Answer:
A, BExplanation:
The two steps that the administrator should perform to resolve the connectivity issues with the domain controller servers are:
Verify the DNS settings in Prism Element: DNS (Domain Name System) is a system that translates domain names into IP addresses. DNS settings are configurations that specify which DNS servers to use for resolving domain names. Verifying the DNS settings in Prism Element is a step that the administrator should perform, because it can help identify and correct any incorrect or outdated DNS server addresses or domain names that may cause connectivity issues with the domain controller servers.
Verify the DNS entries for the given domain name: DNS entries are records that map domain names to IP addresses or other information. Verifying the DNS entries for the given domain name is another step that the administrator should perform, because it can help check and update any incorrect or outdated IP addresses or other information that may cause connectivity issues with the domain controller servers. References: Nutanix Files Administration Guide, page 32; Nutanix Files Troubleshooting Guide
What are two network requirements for a four-node FSVM deployment? (Choose two.)
Options:
Four available IP addresses on the Client network
Four available IP addresses on the Storage network
Five available IP addresses on the Storage network
Five available IP addresses on the Client network
Answer:
A, BExplanation:
Nutanix Files, part of Nutanix Unified Storage (NUS), uses File Server Virtual Machines (FSVMs) to manage file services. A four-node FSVM deployment means four FSVMs are deployed, typically one per node in a four-node cluster. Nutanix Files requires two networks for FSVMs:
Client Network: Used for client-facing communication (e.g., SMB, NFS access).
Storage Network: Used for internal communication with the Nutanix cluster’s storage pool.
Each FSVM requires one IP address on each network, as established in Question 1.
Analysis of Options:
Option A (Four available IP addresses on the Client network): Correct. In a four-node FSVM deployment, each FSVM requires one IP address on the Client network for client communication (e.g., SMB, NFS). With four FSVMs, this means four IP addresses are needed on the Client network, one for each FSVM.
Option B (Four available IP addresses on the Storage network): Correct. Each FSVM also requires one IP address on the Storage network for internal communication with the Nutanix cluster’s storage pool. For four FSVMs, this means four IP addresses are needed on the Storage network, one for each FSVM.
Option C (Five available IP addresses on the Storage network): Incorrect. Only four IP addresses are needed on the Storage network for a four-node FSVM deployment—one per FSVM. A fifth IP address is not required, as there is no additional entity (e.g., a virtual IP) needed for the Storage network in this context.
Option D (Five available IP addresses on the Client network): Incorrect. Similarly, only four IP addresses are needed on the Client network for the four FSVMs. A fifth IP address might be needed in other scenarios (e.g., a virtual IP for load balancing in some configurations), but for a standard four-node FSVM deployment, four IPs suffice, as established in Question 1.
Selected Requirements:
A: Four IP addresses on the Client network are required, one for each of the four FSVMs.
B: Four IP addresses on the Storage network are required, one for each of the four FSVMs.
Why These Requirements?
Each FSVM in a Nutanix Files deployment requires one IP address on the Client network for client access and one on the Storage network for internal storage communication. For a four-node FSVM deployment, this translates to exactly four IP addresses on each network, matching the number of FSVMs.
Exact Extract from Nutanix Documentation:
From the Nutanix Files Deployment Guide (available on the Nutanix Portal):
“A Nutanix Files deployment with four FSVMs requires four available IP addresses on the Client network for client communication (SMB/NFS) and four available IP addresses on the Storage network for internal communication with the Nutanix cluster’s storage pool.”
An organization is implementing their first Nutanix cluster. In addition to hosting VMs, the cluster will be providing block storage services to existing physical servers, as well as CIFS shares and NFS exports to the end users. Security policies dictate that separate networks are used for different functions, which are already configured as:
Management - VLAN 500 - 10.10.50.0/24
iSCSI access - VLAN 510 - 10.10.51.0/24
Files access - VLAN 520 - 10.10.52.0/24How should the administrator configure the cluster to ensure the CIFS and NFS traffic is on the correct network and accessible by the end users?
Options:
Create a new subnet in Network Configuration, assign it VLAN 520, and configure the Files client network on it.
Configure the Data Services IP in Prism Element with an IP on VLAN 520.
Create a new virtual switch in Network Configuration, assign it VLAN 520, and configure the Files client network on it.
Configure the Data Services IP in Prism Central with an IP on VLAN 520.
Answer:
AExplanation:
The organization is deploying a Nutanix cluster to provide block storage (via iSCSI), CIFS shares, and NFS exports (via Nutanix Files). Nutanix Files, part of Nutanix Unified Storage (NUS), uses File Server Virtual Machines (FSVMs) to serve CIFS (SMB) and NFS shares to end users. The security policy requires separate networks:
Management traffic on VLAN 500 (10.10.50.0/24).
iSCSI traffic on VLAN 510 (10.10.51.0/24).
Files traffic on VLAN 520 (10.10.52.0/24).
To ensure CIFS and NFS traffic uses VLAN 520 and is accessible by end users, the cluster must be configured to route Files traffic over the correct network.
Analysis of Options:
Option A (Create a new subnet in Network Configuration, assign it VLAN 520, and configure the Files client network on it): Correct. Nutanix Files requires two networks: a Client network (for CIFS/NFS traffic to end users) and a Storage network (for internal communication with the cluster’s storage pool). To isolate Files traffic on VLAN 520, the administrator should create a new subnet in the cluster’s Network Configuration (via Prism Element), assign it to VLAN 520, and then configure the Files instance to use this subnet as its Client network. This ensures that CIFS and NFS traffic is routed over VLAN 520, making the shares accessible to end users on that network.
Option B (Configure the Data Services IP in Prism Element with an IP on VLAN 520): Incorrect. The Data Services IP is used for iSCSI traffic (as seen in Question 25, where it was configured for VLAN 510). It is not used for CIFS or NFS traffic, which is handled by Nutanix Files. Configuring the Data Services IP on VLAN 520 would incorrectly route iSCSI traffic, not Files traffic.
Option C (Create a new virtual switch in Network Configuration, assign it VLAN 520, and configure the Files client network on it): Incorrect. A virtual switch is used for VM networking (e.g., for AHV VMs), but Nutanix Files traffic is handled by FSVMs, which use the cluster’s network configuration for external communication. While FSVMs are VMs, their network configuration is managed at the Files instance level by specifying the Client network, not by creating a new virtual switch. The correct approach is to configure the subnet for the Files Client network, as in option A.
Option D (Configure the Data Services IP in Prism Central with an IP on VLAN 520): Incorrect. As with option B, the Data Services IP is for iSCSI traffic, not CIFS/NFS traffic. Additionally, the Data Services IP is configured in Prism Element, not Prism Central, making this option doubly incorrect.
Why Option A?
Nutanix Files requires a Client network for CIFS and NFS traffic. By creating a new subnet in the cluster’s Network Configuration, assigning it to VLAN 520, and configuring the Files instance to use this subnet as its Client network, the administrator ensures that all CIFS and NFS traffic is routed over VLAN 520, meeting the security policy and ensuring accessibility for end users.
Exact Extract from Nutanix Documentation:
From the Nutanix Files Administration Guide (available on the Nutanix Portal):
“Nutanix Files requires a Client network for CIFS and NFS traffic to end users. To isolate Files traffic on a specific network, create a subnet in the cluster’s Network Configuration in Prism Element, assign it the appropriate VLAN (e.g., VLAN 520), and configure the Files instance to use this subnet as its Client network. This ensures that all client traffic (SMB/NFS) is routed over the specified network.”
An administrator needs to scale out an existing Files instance. Based on the Company’s requirements, File instance has four FSVMs configured and needs to expand to six.
How many additional Client IP addresses and Storage IP addresses does the administrator require to complete this task?
Options:
3 Client IPs and 2 Storage IPs
2 Client IPs and 2 Storage IPs
3 Client IPs and 3 Storage IPs
2 Client IPs and 3 Storage IPs
Answer:
BExplanation:
To scale out an existing Files instance, the administrator needs to add one Client IP and one Storage IP for each additional FSVM. Since the Files instance needs to expand from four FSVMs to six FSVMs, the administrator needs to add two Client IPs and two Storage IPs in total. The Client IPs are used for communication between the FSVMs and the clients, while the Storage IPs are used for communication between the FSVMs and the CVMs. References: Nutanix Files Administration Guide, page 28; Nutanix Files Solution Guide, page 7
An administrator has been tasked with updating the cool-off interval of an existing WORM share from the default value to five minutes. How should the administrator complete this task?
Options:
Delete and re-create the WORM share.
Update the worm_cooloff_interval parameter using CLI.
Contact support to update the WORM share.
Use FSM to update the worm_cooloff_interval parameter.
Answer:
BExplanation:
Nutanix Files, part of Nutanix Unified Storage (NUS), supports WORM (Write Once, Read Many) shares to enforce immutability for compliance and data retention. A WORM share prevents files from being modified or deleted for a specified retention period. The “cool-off interval” (or cool-off period) is the time after a file is written to a WORM share during which it can still be modified or deleted before becoming immutable. The default cool-off interval is typically 1 minute, and the administrator wants to update it to 5 minutes.
Analysis of Options:
Option A (Delete and re-create the WORM share): Incorrect. Deleting and re-creating the WORM share would remove the existing share and its data, which is disruptive and unnecessary. The cool-off interval can be updated without deleting the share, making this an inefficient and incorrect approach.
Option B (Update the worm_cooloff_interval parameter using CLI): Correct. The worm_cooloff_interval parameter controls the cool-off period for WORM shares in Nutanix Files. This parameter can be updated using the Nutanix CLI (e.g., ncli or afs commands) on the file server. The administrator can log into an FSVM, use the CLI to set the worm_cooloff_interval to 5 minutes (300 seconds), and apply the change without disrupting the share. This is the most direct and efficient method to update the cool-off interval.
Option C (Contact support to update the WORM share): Incorrect. Contacting Nutanix support is unnecessary for this task, as updating the cool-off interval is a standard administrative action that can be performed using the CLI. Support is typically needed for complex issues, not for configurable parameters like this.
Option D (Use FSM to update the worm_cooloff_interval parameter): Incorrect. FSM (File Server Manager) is not a standard Nutanix tool or interface for managing Files configurations. The correct method is to use the CLI (option B) to update the worm_cooloff_interval parameter. While the Files Console (FSM-like interface) can manage some share settings, the cool-off interval requires CLI access.
Why Option B?
The worm_cooloff_interval parameter is a configurable setting in Nutanix Files that controls the cool-off period for WORM shares. Updating this parameter via the CLI (e.g., using ncli or afs commands on an FSVM) allows the administrator to change the cool-off interval from the default (1 minute) to 5 minutes without disrupting the existing share. This is the recommended and most efficient method per Nutanix documentation.
Exact Extract from Nutanix Documentation:
From the Nutanix Files Administration Guide (available on the Nutanix Portal):
“The cool-off interval for a WORM share, which determines the time after a file is written during which it can still be modified, is controlled by the worm_cooloff_interval parameter. To update this interval, use the CLI on an FSVM to set the parameter (e.g., to 300 seconds for 5 minutes) using commands like ncli or afs, then apply the change.”
After configuring Smart DR, an administrator is unable to see the policy in the Policies tab. The administrator has confirmed that all FSVMs are able to connect to Prism Central via port 9440 bidirectionally. What is the possible reason for this issue?
Options:
The primary and recovery file servers do not have the same version.
Port 7515 should be open for all External/Client IPs of FSVMs on the Source and Target cluster.
The primary and recovery file servers do not have the same protocols.
Port 7515 should be open for all Internal/Storage IPs of FSVMs on the Source and Target cluster.
Answer:
AExplanation:
Smart DR in Nutanix Files, part of Nutanix Unified Storage (NUS), is a disaster recovery (DR) solution that simplifies the setup of replication policies between file servers (e.g., using NearSync, as seen in Question 24). After configuring a Smart DR policy, the administrator expects to see it in the Policies tab in Prism Central, but it is not visible despite confirmed connectivity between FSVMs and Prism Central via port 9440 (used for Prism communication, as noted in Question 21). This indicates a potential mismatch or configuration issue.
Analysis of Options:
Option A (The primary and recovery file servers do not have the same version): Correct. Smart DR requires that the primary and recovery file servers (source and target) run the same version of Nutanix Files to ensure compatibility. If the versions differ (e.g., primary on Files 4.0, recovery on Files 3.8), the Smart DR policy may fail to register properly in Prism Central, resulting in it not appearing in the Policies tab. This is a common issue in mixed-version environments, as Smart DR relies on consistent features and APIs across both file servers.
Option B (Port 7515 should be open for all External/Client IPs of FSVMs on the Source and Target cluster): Incorrect. Port 7515 is not a standard port for Nutanix Files or Smart DR communication. The External/Client network of FSVMs (used for SMB/NFS traffic) communicates with clients, not between FSVMs or with Prism Central for policy management. Smart DR communication between FSVMs and Prism Central uses port 9440 (already confirmed open), and replication traffic between FSVMs typically uses other ports (e.g., 2009, 2020), but not 7515.
Option C (The primary and recovery file servers do not have the same protocols): Incorrect. Nutanix Files shares can support multiple protocols (e.g., SMB, NFS), but Smart DR operates at the file server level, not the protocol level. The replication policy in Smart DR replicates share data regardless of the protocol, and a protocol mismatch would not prevent the policy from appearing in the Policies tab—it might affect client access, but not policy visibility.
Option D (Port 7515 should be open for all Internal/Storage IPs of FSVMs on the Source and Target cluster): Incorrect. Similar to option B, port 7515 is not relevant for Smart DR or Nutanix Files communication. The Internal/Storage network of FSVMs is used for communication with the Nutanix cluster’s storage pool, but Smart DR policy management and replication traffic do not rely on port 7515. The key ports for replication (e.g., 2009, 2020) are typically already open, and the issue here is policy visibility, not replication traffic.
Why Option A?
Smart DR requires compatibility between the primary and recovery file servers, including running the same version of Nutanix Files. A version mismatch can cause the Smart DR policy to fail registration in Prism Central, preventing it from appearing in the Policies tab. Since port 9440 connectivity is already confirmed, the most likely issue is a version mismatch, which is a common cause of such problems in Nutanix Files DR setups.
Exact Extract from Nutanix Documentation:
From the Nutanix Files Administration Guide (available on the Nutanix Portal):
“Smart DR requires that the primary and recovery file servers run the same version of Nutanix Files to ensure compatibility. A version mismatch between the source and target file servers can prevent the Smart DR policy from registering properly in Prism Central, resulting in the policy not appearing in the Policies tab.”
A company uses Linux and Windows workstations. The administrator is evaluating solution for their file storage needs.
The solution should support these requirements:
• Distributed File System
• Active Directory integrated
• Scale out architecture
Options:
Mine
Objects
Volumes
Files
Answer:
DExplanation:
The solution that meets the company’s requirements for their file storage needs is Files. Files is a feature that allows users to create and manage file server instances (FSIs) on a Nutanix cluster. FSIs can provide SMB and NFS access to file shares and exports for different types of clients. Files supports these requirements:
Distributed File System: Files uses a distributed file system that spans across multiple FSVMs (File Server VMs), which improves scalability, performance, and availability.
Active Directory integrated: Files can integrate with Active Directory for authentication and authorization of SMB clients and multiprotocol NFS clients.
Scale out architecture: Files can scale out by adding more FSVMs to an existing FSI or creating new FSIs on the same or different clusters. References: Nutanix Files Administration Guide, page 27; Nutanix Files Solution Guide, page 6
How many configure snapshots are supported for SSR in a file server?
Options:
25
50
100
200
Answer:
DExplanation:
The number of configurable snapshots that are supported for SSR in a file server is 200. SSR (Snapshot-based Replication) is a feature that allows administrators to replicate snapshots of shares or exports from one file server to another file server on a different cluster or site for disaster recovery purposes. SSR can be configured with various parameters, such as replication frequency, replication status, replication mode, etc. SSR supports up to 200 configurable snapshots per share or export in a file server. References: Nutanix Files Administration Guide, page 81; Nutanix Files Solution Guide, page 9
An administrator sees that the Cluster drop-down or the Subnets drop-down shows empty lists or an error message when no Prism Element clusters or subnets are available for deployment, respectively. Additionally, the administrator sees that no Prism Element clusters are listed during the addition of multi-cluster to the Object Store. What would cause the Prism Element clusters or subnets to not appear in the user interface?
Options:
The logged-in user does not have access to any Prism Central.
The logged-in user does not have access to any subnets on the allowed Prism Central.
The administrator has just created an access policy granting user access to Prism Element.
The administrator has just created an access policy denying user access to a subnet in Prism Element.
Answer:
AExplanation:
Nutanix Objects, part of Nutanix Unified Storage (NUS), is deployed and managed through Prism Central (PC), which provides a centralized interface for managing multiple Prism Element (PE) clusters. When deploying Objects or adding multi-cluster support to an Object Store, the administrator selects a PE cluster and associated subnets from drop-down lists in the Prism Central UI. If these drop-down lists are empty or show an error, it indicates an issue with visibility or access to the clusters or subnets.
Analysis of Options:
Option A (The logged-in user does not have access to any Prism Central): Correct. Prism Central is required to manage Nutanix Objects deployments and multi-cluster configurations. If the logged-in user does not have access to any Prism Central instance (e.g., due to RBAC restrictions or no PC being deployed), they cannot see any PE clusters or subnets in the UI, as Prism Central is the interface that aggregates this information. This would result in empty drop-down lists for clusters and subnets, as well as during multi-cluster addition for the Object Store.
Option B (The logged-in user does not have access to any subnets on the allowed Prism Central): Incorrect. While subnet access restrictions could prevent subnets from appearing in the Subnets drop-down, this does not explain why the Cluster drop-down is empty or why no clusters are listed during multi-cluster addition. The issue is broader—likely related to Prism Central access itself—rather than subnet-specific permissions.
Option C (The administrator has just created an access policy granting user access to Prism Element): Incorrect. Granting access to Prism Element directly does not affect visibility in Prism Central’s UI. Objects deployment and multi-cluster management are performed through Prism Central, not Prism Element. Even if the user has PE access, they need PC access to see clusters and subnets in the Objects deployment workflow.
Option D (The administrator has just created an access policy denying user access to a subnet in Prism Element): Incorrect. Denying access to a subnet in Prism Element might affect subnet visibility in the Subnets drop-down, but it does not explain the empty Cluster drop-down or the inability to see clusters during multi-cluster addition. Subnet access policies are secondary to the broader issue of Prism Central access.
Why Option A?
The core issue is that Prism Central is required to display PE clusters and subnets in the UI for Objects deployment and multi-cluster management. If the logged-in user does not have access to any Prism Central instance (e.g., they are not assigned the necessary role, such as Prism Central Admin, or no PC is registered), the UI cannot display any clusters or subnets, resulting in empty drop-down lists. This also explains why no clusters are listed during multi-cluster addition for the Object Store, as Prism Central is the central management point for such operations.
Exact Extract from Nutanix Documentation:
From the Nutanix Objects Deployment Guide (available on the Nutanix Portal):
“Nutanix Objects deployment and multi-cluster management are performed through Prism Central. The logged-in user must have access to Prism Central with appropriate permissions (e.g., Prism Central Admin role) to view Prism Element clusters and subnets in the deployment UI. If the user does not have access to Prism Central, the Cluster and Subnets drop-down lists will be empty, and multi-cluster addition will fail to list available clusters.”
An administrator is having difficulty enabling Data Lens for a file server. What is the most likely cause of this issue?
Options:
The file server has been cloned.
SSR is enabled on the file server.
The file server is in a Protection Domain.
The file server has blacklisted file types.
Answer:
AExplanation:
Nutanix Data Lens, a service integrated with Nutanix Unified Storage (NUS), provides data governance, analytics, and ransomware protection for Nutanix Files. Enabling Data Lens for a file server involves configuring the service to monitor the file server’s shares. If the administrator is unable to enable Data Lens, there may be a configuration or compatibility issue with the file server.
Analysis of Options:
Option A (The file server has been cloned): Correct. Cloning a file server (e.g., creating a duplicate file server instance via cloning in Nutanix) is not a supported configuration for Data Lens. Data Lens relies on a unique file server identity to manage its metadata and analytics. If the file server has been cloned, Data Lens may fail to enable due to conflicts in identity or metadata, as the cloned file server may not be properly registered or recognized by Data Lens.
Option B (SSR is enabled on the file server): Incorrect. Self-Service Restore (SSR) is a feature in Nutanix Files that allows users to recover previous versions of files in SMB shares. Enabling SSR does not affect the ability to enable Data Lens, as the two features are independent and can coexist on a file server.
Option C (The file server is in a Protection Domain): Incorrect. A Protection Domain in Nutanix is used for disaster recovery (DR) of VMs or Volume Groups, not file servers directly. Nutanix Files uses replication policies (e.g., NearSync) for DR, not Protection Domains. Even if the file server is part of a replication setup, this does not prevent Data Lens from being enabled.
Option D (The file server has blacklisted file types): Incorrect. Blacklisting file types in Nutanix Files prevents certain file extensions from being stored on shares (e.g., for security reasons). However, this feature does not affect the ability to enable Data Lens, which operates at a higher level to analyze file metadata and user activity, regardless of file types.
Why Option A?
Cloning a file server creates a duplicate instance that may not be properly registered with Data Lens, leading to conflicts in identity, metadata, or configuration. Nutanix documentation specifies that Data Lens requires a uniquely deployed file server, and cloning can cause issues when enabling the service, making this the most likely cause of the administrator’s difficulty.
Exact Extract from Nutanix Documentation:
From the Nutanix Data Lens Administration Guide (available on the Nutanix Portal):
“Data Lens requires a uniquely deployed file server to enable its services. Cloning a file server is not supported, as it may result in conflicts with Data Lens metadata and configuration. If a file server has been cloned, Data Lens may fail to enable, and the file server must be redeployed or re-registered to resolve the issue.”
An administrator is required to place all iSCSI traffic on an isolated network. How can the administrator meet this requirement?
Options:
Create a new network interface on the CVMs via ncli.
Configure the Data Services IP on an isolated network.
Configure network segmentation for Volumes.
Create a Volumes network in Prism Central.
Answer:
BExplanation:
Nutanix Volumes, part of Nutanix Unified Storage (NUS), provides block storage services via iSCSI to external hosts, such as physical servers. The iSCSI traffic is managed by the Controller VMs (CVMs) in the Nutanix cluster, and a virtual IP address called the Data Services IP is used for iSCSI communication. To isolate iSCSI traffic on a dedicated network, the administrator must ensure that this traffic is routed over the isolated network.
Analysis of Options:
Option A (Create a new network interface on the CVMs via ncli): Incorrect. While it’s possible to create additional network interfaces on CVMs using the ncli command-line tool, this is not the recommended or standard method for isolating iSCSI traffic. The Data Services IP is the primary mechanism for managing iSCSI traffic, and it can be assigned to an isolated network without creating new interfaces on each CVM.
Option B (Configure the Data Services IP on an isolated network): Correct. The Data Services IP (also known as the iSCSI Data Services IP) is a cluster-wide virtual IP used for iSCSI traffic. By configuring the Data Services IP to use an IP address on the isolated network (e.g., a specific VLAN or subnet dedicated to iSCSI), the administrator ensures that all iSCSI traffic is routed over that network, meeting the requirement for isolation. This configuration is done in Prism Element under the cluster’s iSCSI settings.
Option C (Configure network segmentation for Volumes): Incorrect. Network segmentation in Nutanix typically refers to isolating traffic using VLANs or separate subnets, which is indirectly achieved by configuring the Data Services IP (option B). However, “network segmentation for Volumes” is not a specific feature or configuration step in Nutanix; the correct approach is to assign the Data Services IP to the isolated network, which inherently segments the traffic.
Option D (Create a Volumes network in Prism Central): Incorrect. Prism Central is used for centralized management of multiple clusters, but the configuration of iSCSI traffic (e.g., the Data Services IP) is performed at the cluster level in Prism Element, not Prism Central. There is no concept of a “Volumes network” in Prism Central for this purpose.
Why Option B?
The Data Services IP is the key configuration for iSCSI traffic in a Nutanix cluster. By assigning this IP to an isolated network (e.g., a dedicated VLAN or subnet), the administrator ensures that all iSCSI traffic is routed over that network, achieving the required isolation. This is a standard and recommended approach in Nutanix for isolating iSCSI traffic.
Exact Extract from Nutanix Documentation:
From the Nutanix Volumes Administration Guide (available on the Nutanix Portal):
“To isolate iSCSI traffic on a dedicated network, configure the Data Services IP with an IP address on the isolated network. This ensures that all iSCSI traffic between external hosts and the Nutanix cluster is routed over the specified network, providing network isolation as required.”
ionization deployed Files in multiple sites, including different geographical locations across the globe. The organization has the following requirements to improves their data management lifecycle:
• Provide a centralized management solution.
• Automate archiving tier policies for compliance purposes.
• Protect the data against ransomware.
Which solution will satisfy the organization's requirements?
Options:
Prims Central
Data Lens
Files Analytics
Answer:
BExplanation:
Data Lens can provide a centralized management solution for Files deployments in multiple sites, including different geographical locations. Data Lens can also automate archiving tier policies for compliance purposes, by allowing administrators to create policies based on file attributes, such as age, size, type, or owner, and move files to a lower-cost tier or delete them after a specified period. Data Lens can also protect the data against ransomware, by allowing administrators to block malicious file signatures from being written to the file system. References: Nutanix Data Lens Administration Guide
What process is initiated when a share is protected for the first time?
Options:
Share data movement is started to the recovery site.
A remote snapshot is created for the share.
The share is created on the recovery site with a similar configuration.
A local snapshot is created for the share.
Answer:
DExplanation:
Nutanix Files, part of Nutanix Unified Storage (NUS), supports data protection for shares through mechanisms like replication and snapshots. When a share is “protected for the first time,” this typically refers to enabling a protection mechanism, such as a replication policy (e.g., NearSync, as seen in Question 24) or a snapshot schedule, to ensure the share’s data can be recovered in case of failure.
Analysis of Options:
Option A (Share data movement is started to the recovery site): Incorrect. While data movement to a recovery site occurs during replication (e.g., with NearSync), this is not the first step when a share is protected. Before data can be replicated, a baseline snapshot is typically created to capture the share’s initial state. Data movement follows the snapshot creation, not as the first step.
Option B (A remote snapshot is created for the share): Incorrect. A remote snapshot implies that a snapshot is created directly on the recovery site, which is not how Nutanix Files protection works initially. The first step is to create a local snapshot on the primary site, which is then replicated to the remote site as part of the protection process (e.g., via NearSync).
Option C (The share is created on the recovery site with a similar configuration): Incorrect. While this step may occur during replication setup (e.g., the remote site’s file server is configured to host a read-only copy of the share, as seen in the exhibit for Question 24), it is not the first process initiated. The share on the recovery site is created as part of the replication process, which begins after a local snapshot is taken.
Option D (A local snapshot is created for the share): Correct. When a share is protected for the first time (e.g., by enabling a snapshot schedule or replication policy), the initial step is to create a local snapshot of the share on the primary site. This snapshot captures the share’s current state and serves as the baseline for protection mechanisms like replication or recovery. For example, in a NearSync setup, a local snapshot is taken, and then the snapshot data is replicated to the remote site.
Why Option D?
Protecting a share in Nutanix Files typically involves snapshots as the foundation for data protection. The first step is to create a local snapshot of the share on the primary site, which captures the share’s data and metadata. This snapshot can then be used for local recovery (e.g., via Self-Service Restore) or replicated to a remote site for DR (e.g., via NearSync). The question focuses on the initial process, making the creation of a local snapshot the correct answer.
Exact Extract from Nutanix Documentation:
From the Nutanix Files Administration Guide (available on the Nutanix Portal):
“When a share is protected for the first time, whether through a snapshot schedule or a replication policy, the initial step is to create a local snapshot of the share on the primary site. This snapshot captures the share’s current state and serves as the baseline for subsequent protection operations, such as replication to a remote site or local recovery.”
An organization currently has a Files cluster for their office data including all department shares. Most of the data is considered cold Data and they are looking to migrate to free up space for future growth or newer data.
The organization has recently added an additional node with more storage. In addition, the organization is using the Public Cloud for .. storage needs.
What will be the best way to achieve this requirement?
Options:
Migrate cold data from the Files to tape storage.
Backup the data using a third-party software and replicate to the cloud.
Setup another cluster and replicate the data with Protection Domain.
Enable Smart Tiering in Files within the File Console.
Answer:
DExplanation:
The organization uses a Nutanix Files cluster, part of Nutanix Unified Storage (NUS), for back office data, with most data classified as Cold Data (infrequently accessed). They want to free up space on the Files cluster for future growth or newer data. They have added a new node with more storage to the cluster and are already using the Public Cloud for other storage needs. The goal is to migrate Cold Data to free up space while considering the best approach.
Analysis of Options:
Option A (Set up another cluster and replicate the data with Protection Domain): Incorrect. Setting up another cluster and using a Protection Domain to replicate data is a disaster recovery (DR) strategy, not a solution for migrating Cold Data to free up space. Protection Domains are used to protect and replicate VMs or Volume Groups, not Files shares directly, and this approach would not address the goal of freeing up space on the existing Files cluster—it would simply create a copy on another cluster.
Option B (Enable Smart Tiering in Files within the Files Console): Correct. Nutanix Files supports Smart Tiering, a feature that allows data to be tiered to external storage, such as the Public Cloud (e.g., AWS S3, Azure Blob), based on access patterns. Cold Data (infrequently accessed) can be automatically tiered to the cloud, freeing up space on the Files cluster while keeping the data accessible through the same share. Since the organization is already using the Public Cloud, Smart Tiering aligns perfectly with their infrastructure and requirements.
Option C (Migrate cold data from Files to tape storage): Incorrect. Migrating data to tape storage is a manual and outdated process for archival. Nutanix Files does not have native integration with tape storage, and this approach would require significant manual effort, making it less efficient than Smart Tiering. Additionally, tape storage is not as easily accessible as cloud storage for future retrieval.
Option D (Back up the data using a third-party software and replicate to the cloud): Incorrect. While backing up data with third-party software and replicating it to the cloud is feasible, it is not the best approach for this scenario. This method would create a backup copy rather than freeing up space on the Files cluster, and it requires additional software and management overhead. Smart Tiering is a native feature that achieves the goal more efficiently by moving Cold Data to the cloud while keeping it accessible.
Why Option B?
Smart Tiering in Nutanix Files is designed for exactly this use case: moving Cold Data to a lower-cost storage tier (e.g., Public Cloud) to free up space on the primary cluster while maintaining seamless access to the data. Since the organization is already using the Public Cloud and has added a new node (which increases local capacity but doesn’t address Cold Data directly), Smart Tiering leverages their existing cloud infrastructure to offload Cold Data, freeing up space for future growth or newer data. This can be configured in the Files Console by enabling Smart Tiering and setting policies to tier Cold Data to the cloud.
Exact Extract from Nutanix Documentation:
From the Nutanix Files Administration Guide (available on the Nutanix Portal):
“Smart Tiering in Nutanix Files allows administrators to tier Cold Data to external storage, such as AWS S3 or Azure Blob, to free up space on the primary Files cluster. This feature can be enabled in the Files Console, where policies can be configured to identify and tier infrequently accessed data while keeping it accessible through the same share.”
Which confirmation is required for an Objects deployment?
Options:
Configure Domain Controllers on both Prism Element and Prism Central.
Configure VPC on both Prism Element and Prism Central.
Configure a dedicated storage container on Prism Element or Prism Cent
Configure NTP servers on both Prism Element and Prism Central.
Answer:
DExplanation:
The configuration that is required for an Objects deployment is to configure NTP servers on both Prism Element and Prism Central. NTP (Network Time Protocol) is a protocol that synchronizes the clocks of devices on a network with a reliable time source. NTP servers are devices that provide accurate time information to other devices on a network. Configuring NTP servers on both Prism Element and Prism Central is required for an Objects deployment, because it ensures that the time settings are consistent and accurate across the Nutanix cluster and the Objects cluster, which can prevent any synchronization issues or errors. References: Nutanix Objects User Guide, page 9; Nutanix Objects Deployment Guide
An administrator needs to configure Files to forward logs to a syslog server. How could the administrator complete this task?
Options:
Configure the syslog in Prism Element.
Configure the syslog in Files Console.
Use the CLI in an FSVM.
Use the CLI in a CVM.
Answer:
CExplanation:
Nutanix Files, part of Nutanix Unified Storage (NUS), generates logs for file service operations, which can be forwarded to a syslog server for centralized logging and monitoring. The process to configure syslog forwarding for Nutanix Files involves interacting with the File Server Virtual Machines (FSVMs), as they handle the file services and generate the relevant logs.
Analysis of Options:
Option A (Configure the syslog in Prism Element): Incorrect. Prism Element manages cluster-level settings, such as storage and VM configurations, but it does not provide a direct interface to configure syslog forwarding for Nutanix Files. Syslog configuration for Files is specific to the FSVMs.
Option B (Configure the syslog in Files Console): Incorrect. The Files Console (accessible via Prism Central) is used for managing Files shares, FSVMs, and policies, but it does not have a built-in option to configure syslog forwarding. Syslog configuration requires direct interaction with the FSVMs.
Option C (Use the CLI in an FSVM): Correct. Nutanix Files logs are managed at the FSVM level, and syslog forwarding can be configured by logging into an FSVM and using the command-line interface (CLI) to set up the syslog server details. This is the standard method documented by Nutanix for enabling syslog forwarding for Files.
Option D (Use the CLI in a CVM): Incorrect. The Controller VM (CVM) manages the Nutanix cluster’s storage and services, but it does not handle Files-specific logging. Syslog configuration for Files must be done on the FSVMs, not the CVMs.
Configuration Process:
To configure syslog forwarding, the administrator would:
SSH into one of the FSVMs in the Files deployment.
Use the nutanix user account to access the FSVM CLI.
Run commands to configure the syslog server (e.g., modify the /etc/syslog.conf file or use Nutanix-specific commands to set the syslog server IP and port).
Restart the syslog service on the FSVM to apply the changes.This process ensures that Files logs are forwarded to the specified syslog server.
Exact Extract from Nutanix Documentation:
From the Nutanix Files Administration Guide (available on the Nutanix Portal):
“To forward Nutanix Files logs to a syslog server, you must configure syslog settings on each FSVM. Log in to an FSVM using SSH and the ‘nutanix’ user account. Use the CLI to update the syslog configuration by specifying the syslog server’s IP address and port. After configuration, restart the syslog service to apply the changes.”
An administrator is tasked with deploying a Microsoft Server Failover Cluster for a critical application that uses shared storage.
The failover cluster instance will consist of VMs running on an AHV-hosted cluster and bare metal servers for maximum resiliency.
What should the administrator do to satisfy this requirement?
Options:
Create a Bucket with Objects.
Provision a Volume Group with Volume.
Create an SMB Share with Files.
Provision a new Storage Container.
Answer:
BExplanation:
Nutanix Volumes allows administrators to provision a volume group with one or more volumes that can be attached to multiple VMs or physical servers via iSCSI. This enables the creation of a Microsoft Server Failover Cluster that uses shared storage for a critical application.
Microsoft Server Failover Cluster typically uses shared block storage for its quorum disk and application data. Nutanix Volumes provides this via iSCSI by provisioning a Volume Group, which can be accessed by both the AHV-hosted VMs and bare metal servers. This setup ensures maximum resiliency, as the shared storage is accessible to all nodes in the cluster, allowing failover between VMs and bare metal servers as needed.
Exact Extract from Nutanix Documentation:
From the Nutanix Volumes Administration Guide (available on the Nutanix Portal):
“Nutanix Volumes provides block storage via iSCSI, which is ideal for Microsoft Server Failover Clusters requiring shared storage. To deploy an MSFC with VMs and bare metal servers, provision a Volume Group in Nutanix Volumes and expose it via iSCSI to all cluster nodes, ensuring shared access to the storage for high availability and failover.”
An administrator is attempting to create a share that will provide user access via SMB and NFS. However, the Enable multiprosotocol accounts for NFS clients settings is not available.
What would cause this issue?
Options:
The connection to Active Directory has not been configured.
The file server instance was only configured with SMB.
The incorrect Files license has been applied.
NFS configured to use unmanaged authentication.
Answer:
AExplanation:
The cause of this issue is that the connection to Active Directory has not been configured. Active Directory is a service that provides centralized authentication and authorization for Windows-based clients and servers. To create a share that will provide user access via SMB and NFS, the administrator must first configure the connection to Active Directory in the Files Console. This will allow the administrator to enable multiprotocol accounts for NFS clients, which are accounts that map NFS users to SMB users and groups for consistent access control across both protocols. References: Nutanix Files Administration Guide, page 32; Nutanix Files Solution Guide, page 6
Which two statements are true about HA for a file server? (Choose two.)
Options:
Files reassigns the IP address of the FSVM to another FSVM.
Shares availability are not impacted for several minutes.
Multiple FSVMs can share a single host.
Affinity rules affect HA.
Answer:
A, DExplanation:
Nutanix Files, part of Nutanix Unified Storage (NUS), uses File Server Virtual Machines (FSVMs) to manage file services. High Availability (HA) in Nutanix Files ensures that shares remain accessible even if an FSVM or host fails. HA mechanisms include IP reassignment, FSVM distribution, and integration with hypervisor HA features.
Analysis of Options:
Option A (Files reassigns the IP address of the FSVM to another FSVM): Correct. In a Nutanix Files HA scenario, if an FSVM fails (e.g., due to a host failure), the IP address of the failed FSVM is reassigned to another FSVM in the file server. This ensures that clients can continue accessing shares without disruption, as the share’s endpoint (IP address) remains the same, even though the backend FSVM handling the request has changed.
Option B (Shares availability are not impacted for several minutes): Incorrect. While Nutanix Files HA minimizes downtime, there is typically a brief disruption (seconds to a minute) during an FSVM failure as the IP address is reassigned and the new FSVM takes over. The statement “not impacted for several minutes” implies a longer acceptable downtime, which is not accurate—HA aims to restore availability quickly, typically within a minute.
Option C (Multiple FSVMs can share a single host): Incorrect. Nutanix Files HA requires that FSVMs are distributed across different hosts to ensure fault tolerance. By default, one FSVM runs per host, and Nutanix uses anti-affinity rules to prevent multiple FSVMs from residing on the same host. This ensures that a single host failure does not impact multiple FSVMs, which would defeat the purpose of HA.
Option D (Affinity rules affect HA): Correct. Nutanix Files leverages hypervisor HA features (e.g., AHV HA) and uses affinity/anti-affinity rules to manage FSVM placement. Anti-affinity rules ensure that FSVMs are placed on different hosts, which is critical for HA—if multiple FSVMs were on the same host, a host failure would impact multiple FSVMs, reducing availability. These rules directly affect how HA functions in a Files deployment.
Selected Statements:
A: IP reassignment is a core HA mechanism in Nutanix Files to maintain share accessibility during FSVM failures.
D: Affinity (specifically anti-affinity) rules ensure FSVM distribution across hosts, which is essential for effective HA.
Exact Extract from Nutanix Documentation:
From the Nutanix Files Administration Guide (available on the Nutanix Portal):
“High Availability (HA) in Nutanix Files ensures continuous share access during failures. If an FSVM fails, its IP address is reassigned to another FSVM in the file server to maintain client connectivity. Nutanix Files uses anti-affinity rules to distribute FSVMs across different hosts, ensuring that a single host failure does not impact multiple FSVMs, which is critical for HA.”
Life Cycle Manager must have compatible versions of which two components before installing or upgrading Files? (Choose two.)
Options:
Nutanix Cluster Check
Active Directory Services
File Server Module
Acropolis Operating System
Answer:
A, DExplanation:
Nutanix Files, part of Nutanix Unified Storage (NUS), can be installed or upgraded using Life Cycle Manager (LCM), a tool in Prism Central or Prism Element for managing software updates. Before installing or upgrading Files, LCM must ensure that the underlying components are compatible to avoid issues during the process.
Analysis of Options:
Option A (Nutanix Cluster Check): Correct. Nutanix Cluster Check (NCC) is a health and compatibility checking tool integrated with LCM. LCM requires a compatible version of NCC to perform pre-upgrade checks and validate the cluster’s readiness for a Files installation or upgrade. NCC ensures that the cluster environment (e.g., hardware, firmware, software) is compatible with the Files version being installed or upgraded.
Option B (Active Directory Services): Incorrect. Active Directory (AD) Services are used by Nutanix Files for user authentication (e.g., for SMB shares or multiprotocol access, as in Question 60), but AD is not a component managed by LCM, nor is it a prerequisite for LCM compatibility. AD configuration is a separate requirement for Files functionality, not LCM operations.
Option C (File Server Module): Incorrect. There is no “File Server Module” component in Nutanix terminology. Nutanix Files itself consists of File Server Virtual Machines (FSVMs), but this is the component being upgraded, not a prerequisite for LCM. LCM manages the Files upgrade directly and does not require a separate “module” compatibility.
Option D (Acropolis Operating System): Correct. The Acropolis Operating System (AOS) is the core operating system of the Nutanix cluster, managing storage, compute, and virtualization. LCM requires a compatible AOS version to install or upgrade Files, as Files relies on AOS features (e.g., storage, networking) and APIs. LCM checks the AOS version to ensure it meets the minimum requirements for the target Files version.
Selected Components:
A: NCC ensures cluster compatibility and readiness, which LCM relies on for Files installation or upgrades.
D: AOS provides the underlying platform for Files, and LCM must ensure its version is compatible with the Files version being deployed.
Exact Extract from Nutanix Documentation:
From the Nutanix Files Administration Guide (available on the Nutanix Portal):
“Before installing or upgrading Nutanix Files using Life Cycle Manager (LCM), ensure that LCM has compatible versions of Nutanix Cluster Check (NCC) and Acropolis Operating System (AOS). NCC performs pre-upgrade checks to validate cluster readiness, while AOS must meet the minimum version requirements for the target Files version.”
Which protocols are supported by Files?
Options:
SMBv2 SMBv3, NFSv2, NFSv3
SMBv1. SMBv2, NFSv2, NFSv3
SMBv1. SMBv2, NFSv3, NFSv4
SMBv2 SMBv3, NFSv3, NFSv4
Answer:
DExplanation:
The protocols that are supported by Files are SMBv2, SMBv3, NFSv3, and NFSv4. SMB (Server Message Block) is a protocol that allows clients to access files, printers, and other resources on a network. NFS (Network File System) is a protocol that allows clients to access files on a remote server as if they were local. Files supports both SMB and NFS protocols for creating shares and exports that can be accessed by different types of clients. References: Nutanix Files Administration Guide, page 31; Nutanix Files Solution Guide, page 6
With the settings shown on the exhibit, if there were 1000 files in the repository, how many files would have to be… anomaly alert to the administrator?
Options:
1
10
100
1000
Answer:
BExplanation:
With the settings shown on the exhibit, if there were 1000 files in the repository, 10 files would have to be deleted within an hour to trigger an anomaly alert to the administrator. Anomaly alert is a feature that notifies the administrator when there is an unusual or suspicious activity on file data, such as mass deletion or encryption. Anomaly alert can be configured with various parameters, such as threshold percentage, time window, minimum number of files, and so on. In this case, the threshold percentage is set to 1%, which means that if more than 1% of files in a repository are deleted within an hour, an anomaly alert will be triggered. Since there are 1000 files in the repository, 1% of them is 10 files. Therefore, if 10 or more files are deleted within an hour, an anomaly alert will be sent to the administrator. References: Nutanix Files Administration Guide, page 98; Nutanix Data Lens User Guide
An administrator needs to add a signature to the ransomware block list. How should the administrator complete this task?
Options:
Open a support ticket to have the new signature added. Nutanix support will provide an updated Block List file.
Add the file signature to the Blocked Files Type in the Files Console.
Search the Block List for the file signature to be added, click Add to Block List when the signature is not found in File Analytics.
Download the Block List CSV file, add the new signature, then upload the CSV.
Answer:
AExplanation:
Nutanix Files, part of Nutanix Unified Storage (NUS), can protect against ransomware using integrated tools like File Analytics and Data Lens, or through integration with third-party solutions. In Question 56, we established that a third-party solution is best for signature-based ransomware prevention with a large list of malicious file signatures (300+). The administrator now needs to add a new signature to the ransomware block list, which refers to the list of malicious file signatures used for blocking.
Analysis of Options:
Option A (Open a support ticket to have the new signature added. Nutanix support will provide an updated Block List file): Correct. Nutanix Files does not natively manage a signature-based ransomware block list within its own tools (e.g., File Analytics, Data Lens), as these focus on behavioral detection (as noted in Question 56). For signature-based blocking, Nutanix integrates with third-party solutions, and the block list (signature database) is typically managed by Nutanix or the third-party provider. To add a new signature, the administrator must open a support ticket with Nutanix, who will coordinate with the third-party provider (if applicable) to update the Block List file and provide it to the customer.
Option B (Add the file signature to the Blocked Files Type in the Files Console): Incorrect. The “Blocked Files Type” in the Files Console allows administrators to blacklist specific file extensions (e.g., .exe, .bat) to prevent them from being stored on shares. This is not a ransomware block list based on signatures—it’s a simple extension-based blacklist, and file signatures (e.g., hashes or patterns used for ransomware detection) cannot be added this way.
Option C (Search the Block List for the file signature to be added, click Add to Block List when the signature is not found in File Analytics): Incorrect. File Analytics provides ransomware detection through behavioral analysis (e.g., anomaly detection, as in Question 7), not signature-based blocking. There is no “Block List” in File Analytics for managing ransomware signatures, and it does not have an “Add to Block List” option for signatures.
Option D (Download the Block List CSV file, add the new signature, then upload the CSV): Incorrect. Nutanix Files does not provide a user-editable Block List CSV file for ransomware signatures. The block list for signature-based blocking is managed by Nutanix or a third-party integration, and updates are handled through support (option A), not by manually editing a CSV file.
Why Option A?
Signature-based ransomware prevention in Nutanix Files relies on third-party integrations, as established in Question 56. The block list of malicious file signatures is not user-editable within Nutanix tools like the Files Console or File Analytics. To add a new signature, the administrator must open a support ticket with Nutanix, who will provide an updated Block List file, ensuring the new signature is properly integrated with the third-party solution.
Exact Extract from Nutanix Documentation:
From the Nutanix Files Administration Guide (available on the Nutanix Portal):
“For signature-based ransomware prevention, Nutanix Files integrates with third-party solutions that maintain a block list of malicious file signatures. To add a new signature to the block list, open a support ticket with Nutanix. Support will coordinate with the third-party provider (if applicable) and provide an updated Block List file to include the new signature.”
An administrator needs to generate a File Analytics report which lists the top owners with space consumed. Which two formats are available to the administrator for this task? (Choose two.)
Options:
XML
CSV
JSON
Answer:
B, CExplanation:
Nutanix File Analytics, part of Nutanix Unified Storage (NUS), provides reporting capabilities for monitoring file server activity, including space usage by owners. The administrator wants to generate a report listing the top owners by space consumed, which is a standard report in File Analytics. The available export formats for such reports determine how the data can be shared or analyzed.
Analysis of Options:
Option A (XML): Incorrect. File Analytics does not support exporting reports in XML format. While XML is a common data format, Nutanix File Analytics focuses on more user-friendly formats like PDF and CSV for report exports.
Option B (PDF): Correct. File Analytics allows reports, such as the top owners by space consumed, to be exported in PDF format. This format is useful for creating a formatted, printable report that can be shared with stakeholders or archived for documentation purposes.
Option C (CSV): Correct. File Analytics also supports exporting reports in CSV (Comma-Separated Values) format. This format is ideal for further analysis, as the data can be imported into tools like Excel or other data processing software to manipulate the list of top owners and their space consumption.
Option D (JSON): Incorrect. JSON is a data format often used for APIs or data interchange, but File Analytics does not support exporting reports in JSON format. The focus is on PDF for presentation and CSV for data analysis.
Selected Formats:
B: PDF format provides a formatted report suitable for sharing or printing.
C: CSV format allows for data export and further analysis in external tools.
Exact Extract from Nutanix Documentation:
From the Nutanix File Analytics Administration Guide (available on the Nutanix Portal):
“File Analytics reports, such as top owners by space consumed, can be exported in PDF format for presentation or CSV format for further analysis. These formats allow administrators to share reports with stakeholders or import the data into other tools for additional processing.”
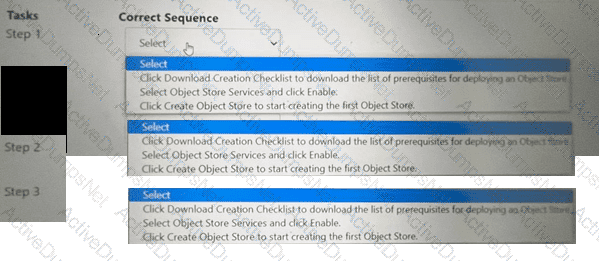
Within the Prism Central Entity > Services > Objects menu option, what is the correct task order for creating an object storage?
Options:
Answer:

Explanation:
The correct task order for creating an object store is:
Select ObjectStore Service and click Enable
Click Create Object Store to start creating the first Object store
Click Download Creation Checklist to download the list of prerequisites for deploying an Object store
The first step is to enable the ObjectStore Service, which is a service that allows users to create and manage object storage clusters on a Nutanix cluster. The second step is to create an Object store, which is an object storage cluster that provides S3-compatible access to buckets and objects for various applications and users. The third step is to download the Creation Checklist, which is a document that lists the prerequisites and configurations that are required for deploying an Object store, such as cluster details, network details, storage details, etc. The administrator should review and complete the Creation Checklist before proceeding with the deployment of the Object store.
Users are complaining about having to reconnect to a share when there are networking issues. Which Files feature should the administrator enable to ensure the sessions will auto-reconnect in such events?
Options:
Durable File Handles
Multi-Protocol Shares
Connected Shares
Workload Optimization
Answer:
AExplanation:
Nutanix Files, part of Nutanix Unified Storage (NUS), provides file sharing services via protocols like SMB and NFS. In environments where users access SMB shares, network interruptions can cause sessions to disconnect, requiring users to manually reconnect. Nutanix Files offers a feature to mitigate this issue for SMB shares.
Analysis of Options:
Option A (Durable File Handles): Correct. Durable File Handles is an SMB feature in Nutanix Files that allows client sessions to automatically reconnect after temporary network interruptions. When enabled, it ensures that file handles remain valid during brief disconnects, allowing the client to resume the session without manual intervention.
Option B (Multi-Protocol Shares): Incorrect. Multi-Protocol Shares allow a share to be accessed via both SMB and NFS, but this feature does not address session reconnection during network issues.
Option C (Connected Shares): Incorrect. “Connected Shares” is not a feature in Nutanix Files. This appears to be a made-up term and does not apply to session reconnection.
Option D (Workload Optimization): Incorrect. Workload Optimization in Nutanix Files involves adjusting the number of FSVMs or resources for performance (as noted in Question 13), but it does not address session reconnection for network issues.
Why Durable File Handles?
Durable File Handles is an SMB 2.1+ feature supported by Nutanix Files. It ensures that file handles persist during network disruptions, allowing clients to auto-reconnect without losing their session state, which directly addresses the users’ complaint.
Exact Extract from Nutanix Documentation:
From the Nutanix Files Administration Guide (available on the Nutanix Portal):
“Durable File Handles is an SMB feature that allows clients to automatically reconnect to a share after temporary network interruptions. When enabled on a Nutanix Files share, it ensures that file handles remain valid, preventing users from having to manually reconnect during brief network outages.”
An administrator needs to allow individual users to restore files and folders hosted in Files.
How can the administrator meet this requirement?
Options:
Configure a Protection Domain for the shares/exports.
Configure a Protection Domain on the FSVMs.
Enable Self-Service Restore on shares/exports.
Enable Self-Service Restore on the FSVMs.
Answer:
CExplanation:
Self-Service Restore (SSR) is a feature that allows individual users to restore files and folders hosted in Files without requiring administrator intervention. SSR can be enabled on a per-share or per-export basis, and users can access the snapshots of their data through a web portal or a Windows client application1. References: Nutanix Files Administration Guide1
An administrator needs to enable a Nutanix feature that will ensure automatic client reconnection to shares whenever there are intermittent server-side networking issues and FSVM HA events. Which Files feature should the administrator enable?
Options:
Multi-Protocol Shares
Connected Shares
Durable File Handles
Persistent File Handles
Answer:
CExplanation:
Nutanix Files, part of Nutanix Unified Storage (NUS), provides file shares (e.g., SMB, NFS) that clients access. Intermittent server-side networking issues or FSVM High Availability (HA) events (e.g., an FSVM failover, as discussed in Question 40) can disrupt client connections. The administrator needs a feature to ensure automatic reconnection to shares during such events, minimizing disruption for users.
Analysis of Options:
Option A (Multi-Protocol Shares): Incorrect. Multi-Protocol Shares allow a share to be accessed via both SMB and NFS (as in Questions 8 and 60), but this feature does not address client reconnection during networking issues or FSVM HA events—it focuses on protocol support, not connection resilience.
Option B (Connected Shares): Incorrect. “Connected Shares” is not a recognized feature in Nutanix Files. It appears to be a made-up term and does not apply to automatic client reconnection.
Option C (Durable File Handles): Correct. Durable File Handles is an SMB feature in Nutanix Files (as noted in Question 19) that ensures automatic client reconnection after temporary server-side disruptions, such as networking issues or FSVM HA events (e.g., failover when an FSVM’s IP is reassigned, as in Question 40). When enabled, Durable File Handles allow SMB clients to maintain their session state and automatically reconnect without user intervention, meeting the requirement.
Option D (Persistent File Handles): Incorrect. “Persistent File Handles” is not a standard feature in Nutanix Files. It may be confused with Durable File Handles (option C), which is the correct term for this SMB capability. Persistent File Handles is not a recognized Nutanix feature.
Why Option C?
Durable File Handles is an SMB 2.1+ feature supported by Nutanix Files that ensures clients can automatically reconnect to shares after server-side disruptions, such as intermittent networking issues or FSVM HA events (e.g., failover). This feature maintains the client’s session state, allowing seamless reconnection without manual intervention, directly addressing the administrator’s requirement.
Exact Extract from Nutanix Documentation:
From the Nutanix Files Administration Guide (available on the Nutanix Portal):
“Durable File Handles is an SMB feature in Nutanix Files that ensures automatic client reconnection to shares during server-side disruptions, such as intermittent networking issues or FSVM HA events. Enable Durable File Handles to maintain client session state and allow seamless reconnection without user intervention.”
An administrator has planned to copy any large files to a Files share through the RoboCopy tool. While moving the data, the copy operation was interrupted due to a network bandwidth issue. Which command option resumes any interrupted copy operation?
Options:
robocopy with the /c option
robocopy with the /s option
robocopy with the /z option
robocopy with the /r option
Answer:
CExplanation:
Nutanix Files, part of Nutanix Unified Storage (NUS), provides CIFS (SMB) shares that can be accessed by Windows clients. RoboCopy (Robust File Copy) is a Windows command-line tool commonly used to copy files to SMB shares, such as those provided by Nutanix Files. The administrator is copying large files to a Files share using RoboCopy, but the operation was interrupted due to a network bandwidth issue. The goal is to resume the interrupted copy operation without restarting from scratch.
Analysis of Options:
Option A (robocopy with the /c option): Incorrect. The /c option is not a valid RoboCopy option. RoboCopy options typically start with a forward slash (e.g., /z, /s), and there is no /c option for resuming interrupted copies.
Option B (robocopy with the /s option): Incorrect. The /s option in RoboCopy copies subdirectories (excluding empty ones) but does not provide functionality to resume interrupted copy operations. It is used to define the scope of the copy, not to handle interruptions.
Option C (robocopy with the /z option): Correct. The /z option in RoboCopy enables “restartable mode,” which allows the tool to resume a copy operation from where it left off if it is interrupted (e.g., due to a network issue). This mode is specifically designed for copying large files over unreliable networks, as it checkpoints the progress and can pick up where it stopped, ensuring the copy operation completes without restarting from the beginning.
Option D (robocopy with the /r option): Incorrect. The /r option in RoboCopy specifies the number of retries for failed copies (e.g., /r:3 retries 3 times). While this can help with transient errors, it does not resume an interrupted copy operation from the point of interruption—it retries the entire file copy, which is inefficient for large files.
Why Option C?
The /z option in RoboCopy enables restartable mode, which is ideal for copying large files to a Nutanix Files share over a network that may experience interruptions. This option ensures that if the copy operation is interrupted (e.g., due to a network bandwidth issue), RoboCopy can resume from the point of interruption, minimizing data retransmission and ensuring efficient completion of the copy.
Exact Extract from Microsoft Documentation (RoboCopy):
From the Microsoft RoboCopy Documentation (available on Microsoft Docs):
“/z : Copies files in restartable mode. In restartable mode, if a file copy is interrupted, RoboCopy can resume the copy operation from where it left off, which is particularly useful for large files or unreliable networks.”
Additional Notes:
Since RoboCopy is a Microsoft tool interacting with Nutanix Files SMB shares, the behavior of RoboCopy options is standard and not specific to Nutanix. However, Nutanix documentation recommends using tools like RoboCopy with appropriate options (e.g., /z) for reliable data migration to Files shares.
Nutanix Files supports SMB features like Durable File Handles (as noted in Question 19), which complement tools like RoboCopy by maintaining session state during brief network interruptions, but the /z option directly addresses resuming the copy operation itself.
An organization currently has two Objects instances deployed between two sites. Both instances are managed via manage the same Prism Central to simplify management.
The organization has a critical application with all data in a bucket that needs to be replicated to the secondary site for DR purposes. The replication needs to be asynchronous, including al delete the marker versions.
Options:
Create a Bucket replication rule, set the destination Objects instances.
With Object Browser, upload the data at the destination site.
Leverage the Objects Baseline Replication Tool from a Linus VM
Use a protection Domain to replicate the objects Volume Group.
Answer:
AExplanation:
The administrator can achieve this requirement by creating a bucket replication rule and setting the destination Objects instance. Bucket replication is a feature that allows administrators to replicate data from one bucket to another bucket on a different Objects instance for disaster recovery or data migration purposes. Bucket replication can be configured with various parameters, such as replication mode, replication frequency, replication status, etc. Bucket replication can also replicate all versions of objects, including delete markers, which are special versions that indicate that an object has been deleted. By creating a bucket replication rule and setting the destination Objects instance, the administrator can replicate data from one Objects instance to another asynchronously, including all delete markers and versions. References: Nutanix Objects User Guide, page 19; Nutanix Objects Solution Guide, page 9
Nutanix Objects, part of Nutanix Unified Storage (NUS), supports replication of buckets between Object Store instances for disaster recovery (DR). The organization has two Objects instances across two sites, managed by the same Prism Central, and needs to replicate a bucket’s data asynchronously, including delete marker versions, to the secondary site.
Analysis of Options:
Option A (With Object Browser, upload the data at the destination site): Incorrect. The Object Browser is a UI tool in Nutanix Objects for managing buckets and objects, but it is not designed for replication. Manually uploading data to the destination site does not satisfy the requirement for asynchronous replication, nor does it handle delete marker versions automatically.
Option B (Leverage the Objects Baseline Replication Tool from a Linux VM): Incorrect. The Objects Baseline Replication Tool is not a standard feature in Nutanix Objects documentation. While third-party tools or scripts might be used for manual replication, Nutanix provides a native solution for bucket replication, making this option unnecessary and incorrect for satisfying the requirement.
Option C (Use a Protection Domain to replicate the Objects Volume Group): Incorrect. Protection Domains are used in Nutanix for protecting VMs and Volume Groups (block storage) via replication, but they do not apply to Nutanix Objects. Objects uses bucket replication rules for DR, not Protection Domains.
Option D (Create a Bucket replication rule, set the destination Objects instance): Correct. Nutanix Objects supports bucket replication rules to replicate data between Object Store instances asynchronously. This feature allows the organization to replicate the bucket to the secondary site, including all versions (such as delete marker versions), as required. The replication rule can be configured in Prism Central, specifying the destination Object Store instance, and it supports asynchronous replication for DR purposes.
Why Option D?
Bucket replication in Nutanix Objects is the native mechanism for asynchronous replication between Object Store instances. It supports replicating all versions of objects, including delete marker versions (which indicate deleted objects in a versioned bucket), ensuring that the secondary site has a complete replica of the bucket for DR. Since both Object Store instances are managed by the same Prism Central, the administrator can easily create a replication rule to meet the requirement.
Exact Extract from Nutanix Documentation:
From the Nutanix Objects Administration Guide (available on the Nutanix Portal):
“Nutanix Objects supports asynchronous bucket replication for disaster recovery. To replicate a bucket to a secondary site, create a bucket replication rule in Prism Central, specifying the destination Object Store instance. The replication rule can be configured to include all versions, including delete marker versions, ensuring that the secondary site maintains a complete replica of the bucket for DR purposes.”
Which user is authorized to deploy File Analytics?
Options:
Prism Central administrator
AD user mapped to a Prism admin role
Prism Element administrator
AD user mapped to a Cluster admin role
Answer:
AExplanation:
The user that is authorized to deploy File Analytics is Prism Central administrator. Prism Central is a web-based user interface that allows administrators to manage multiple Nutanix clusters and services, including Files and File Analytics. Prism Central administrator is a user role that has full access and control over all Prism Central features and functions. To deploy File Analytics, the user must log in to Prism Central as a Prism Central administrator and follow the steps in the File Analytics Deployment wizard. References: Nutanix Files Administration Guide, page 93; Nutanix File Analytics Deployment Guide
Unlock NCP-US-6.5 Features
- NCP-US-6.5 All Real Exam Questions
- NCP-US-6.5 Exam easy to use and print PDF format
- Download Free NCP-US-6.5 Demo (Try before Buy)
- Free Frequent Updates
- 100% Passing Guarantee by Activedumpsnet
Questions & Answers PDF Demo
- NCP-US-6.5 All Real Exam Questions
- NCP-US-6.5 Exam easy to use and print PDF format
- Download Free NCP-US-6.5 Demo (Try before Buy)
- Free Frequent Updates
- 100% Passing Guarantee by Activedumpsnet