- Home
- Appian
- Lead Developer
- ACD301
- ACD301 - Appian Certified Lead Developer
Appian ACD301 Appian Certified Lead Developer Exam Practice Test
Appian Certified Lead Developer Questions and Answers
You need to generate a PDF document with specific formatting. Which approach would you recommend?
Options:
Create an embedded interface with the necessary content and ask the user to use the browser "Print" functionality to save it as a PDF.
Use the PDF from XSL-FO Transformation smart service to generate the content with the specific format.
Use the Word Doc from Template smart service in a process model to add the specific format.
There is no way to fulfill the requirement using Appian. Suggest sending the content as a plain email instead.
Answer:
BExplanation:
Comprehensive and Detailed In-Depth Explanation:
As an Appian Lead Developer, generating a PDF with specific formatting is a common requirement, and Appian provides several tools to achieve this. The question emphasizes "specific formatting," which implies precise control over layout, styling, and content structure. Let’s evaluate each option based on Appian’s official documentation and capabilities:
A. Create an embedded interface with the necessary content and ask the user to use the browser "Print" functionality to save it as a PDF:This approach involves designing an interface (e.g., using SAIL components) and relying on the browser’s native print-to-PDF feature. While this is feasible for simple content, it lacks precision for "specific formatting." Browser rendering varies across devices and browsers, and print styles (e.g., CSS) are limited in Appian’s control. Appian Lead Developer best practices discourage relying on client-side functionality for critical document generation due to inconsistency and lack of automation. This is not a recommended solution for a production-grade requirement.
B. Use the PDF from XSL-FO Transformation smart service to generate the content with the specific format:This is the correct choice. The "PDF from XSL-FO Transformation" smart service (available in Appian’s process modeling toolkit) allows developers to generate PDFs programmatically with precise formatting using XSL-FO (Extensible Stylesheet Language Formatting Objects). XSL-FO provides fine-grained control over layout, fonts, margins, and styling—ideal for "specific formatting" requirements. In a process model, you can pass XML data and an XSL-FO stylesheet to this smart service, producing a downloadable PDF. Appian’s documentation highlights this as the preferred method for complex PDF generation, making it a robust, scalable, and Appian-native solution.
C. Use the Word Doc from Template smart service in a process model to add the specific format:This option uses the "Word Doc from Template" smart service to generate a Microsoft Word document from a template (e.g., a .docx file with placeholders). While it supports formatting defined in the template and can be converted to PDF post-generation (e.g., via a manual step or external tool), it’s not a direct PDF solution. Appian doesn’t natively convert Word to PDF within the platform, requiring additional steps outside the process model. For "specific formatting" in a PDF, this is less efficient and less precise than the XSL-FO approach, as Word templates are better suited for editable documents rather than final PDFs.
D. There is no way to fulfill the requirement using Appian. Suggest sending the content as a plain email instead:This is incorrect. Appian provides multiple tools for document generation, including PDFs, as evidenced by options B and C. Suggesting a plain email fails to meet the requirement of generating a formatted PDF and contradicts Appian’s capabilities. Appian Lead Developer training emphasizes leveraging platform features to meet business needs, ruling out this option entirely.
Conclusion: The PDF from XSL-FO Transformation smart service (B) is the recommended approach. It provides direct PDF generation with specific formatting control within Appian’s process model, aligning with best practices for document automation and precision. This method is scalable, repeatable, and fully supported by Appian’s architecture.
Your team has deployed an application to Production with an underperforming view. Unexpectedly, the production data is ten times that of what was tested, and you must remediate the issue. What is the best option you can take to mitigate their performance concerns?
Options:
Bypass Appian’s query rule by calling the database directly with a SQL statement.
Create a table which is loaded every hour with the latest data.
Create a materialized view or table.
Introduce a data management policy to reduce the volume of data.
Answer:
CExplanation:
Comprehensive and Detailed In-Depth Explanation:
As an Appian Lead Developer, addressing performance issues in production requires balancing Appian’s best practices, scalability, and maintainability. The scenario involves an underperforming view due to a significant increase in data volume (ten times the tested amount), necessitating a solution that optimizes performance while adhering to Appian’s architecture. Let’s evaluate each option:
A. Bypass Appian’s query rule by calling the database directly with a SQL statement:This approach involves circumventing Appian’s query rules (e.g., a!queryEntity) and directly executing SQL against the database. While this might offer a quick performance boost by avoiding Appian’s abstraction layer, it violates Appian’s core design principles. Appian Lead Developer documentation explicitly discourages direct database calls, as they bypass security (e.g., Appian’s row-level security), auditing, and portability features. This introduces maintenance risks, dependencies on database-specific logic, and potential production instability—making it an unsustainable and non-recommended solution.
B. Create a table which is loaded every hour with the latest data:This suggests implementing a staging table updated hourly (e.g., via an Appian process model or ETL process). While this could reduce query load by pre-aggregating data, it introduces latency (data is only fresh hourly), which may not meet real-time requirements typical in Appian applications (e.g., a customer-facing view). Additionally, maintaining an hourly refresh process adds complexity and overhead (e.g., scheduling, monitoring). Appian’s documentation favors more efficient, real-time solutions over periodic refreshes unless explicitly required, making this less optimal for immediate performance remediation.
C. Create a materialized view or table:This is the best choice. A materialized view (or table, depending on the database) pre-computes and stores query results, significantly improving retrieval performance for large datasets. In Appian, you can integrate a materialized view with a Data Store Entity, allowing a!queryEntity to fetch data efficiently without changing application logic. Appian Lead Developer training emphasizes leveraging database optimizations like materialized views to handle large data volumes, as they reduce query execution time while keeping data consistent with the source (via periodic or triggered refreshes, depending on the database). This aligns with Appian’s performance optimization guidelines and addresses the tenfold data increase effectively.
D. Introduce a data management policy to reduce the volume of data:This involves archiving or purging data to shrink the dataset (e.g., moving old records to an archive table). While a long-term data management policy is a good practice (and supported by Appian’s Data Fabric principles), it doesn’t immediately remediate the performance issue. Reducing data volume requires business approval, policy design, and implementation—delaying resolution. Appian documentation recommends combining such strategies with technical fixes (like C), but as a standalone solution, it’s insufficient for urgent production concerns.
Conclusion: Creating a materialized view or table (C) is the best option. It directly mitigates performance by optimizing data retrieval, integrates seamlessly with Appian’s Data Store, and scales for large datasets—all while adhering to Appian’s recommended practices. The view can be refreshed as needed (e.g., via database triggers or schedules), balancing performance and data freshness. This approach requires collaboration with a DBA to implement but ensures a robust, Appian-supported solution.
An Appian application contains an integration used to send a JSON, called at the end of a form submission, returning the created code of the user request as the response. To be able to efficiently follow their case, the user needs to be informed of that code at the end of the process. The JSON contains case fields (such as text, dates, and numeric fields) to a customer’s API. What should be your two primary considerations when building this integration?
Options:
A process must be built to retrieve the API response afterwards so that the user experience is not impacted.
The request must be a multi-part POST.
The size limit of the body needs to be carefully followed to avoid an error.
A dictionary that matches the expected request body must be manually constructed.
Answer:
C, DExplanation:
Comprehensive and Detailed In-Depth Explanation:
As an Appian Lead Developer, building an integration to send JSON to a customer’s API and return a code to the user involves balancing usability, performance, and reliability. The integration is triggered at form submission, and the user must see the response (case code) efficiently. The JSON includes standard fields (text, dates, numbers), and the focus is on primary considerations for the integration itself. Let’s evaluate each option based on Appian’s official documentation and best practices:
A. A process must be built to retrieve the API response afterwards so that the user experience is not impacted:This suggests making the integration asynchronous by calling it in a process model (e.g., via a Start Process smart service) and retrieving the response later, avoiding delays in the UI. While this improves user experience for slow APIs (e.g., by showing a “Processing” message), it contradicts the requirement that the user is “informed of that code at the end of the process.” Asynchronous processing would delay the code display, requiring additional steps (e.g., a follow-up task), which isn’t efficient for this use case. Appian’s default integration pattern (synchronous call in an Integration object) is suitable unless latency is a known issue, making this a secondary—not primary—consideration.
B. The request must be a multi-part POST:A multi-part POST (e.g., multipart/form-data) is used for sending mixed content, like files and text, in a single request. Here, the payload is a JSON containing case fields (text, dates, numbers)—no files are mentioned. Appian’s HTTP Connected System and Integration objects default to application/json for JSON payloads via a standard POST, which aligns with REST API norms. Forcing a multi-part POST adds unnecessary complexity and is incompatible with most APIs expecting JSON. Appian documentation confirms this isn’t required for JSON-only data, ruling it out as a primary consideration.
C. The size limit of the body needs to be carefully followed to avoid an error:This is a primary consideration. Appian’s Integration object has a payload size limit (approximately 10 MB, though exact limits depend on the environment and API), and exceeding it causes errors (e.g., 413 Payload Too Large). The JSON includes multiple case fields, and while “hundreds of thousands” isn’t specified, large datasets could approach this limit. Additionally, the customer’s API may impose its own size restrictions (common in REST APIs). Appian Lead Developer training emphasizes validating payload size during design—e.g., testing with maximum expected data—to prevent runtime failures. This ensures reliability and is critical for production success.
D. A dictionary that matches the expected request body must be manually constructed:This is also a primary consideration. The integration sends a JSON payload to the customer’s API, which expects a specific structure (e.g., { "field1": "text", "field2": "date" }). In Appian, the Integration object requires a dictionary (key-value pairs) to construct the JSON body, manually built to match the API’s schema. Mismatches (e.g., wrong field names, types) cause errors (e.g., 400 Bad Request) or silent failures. Appian’s documentation stresses defining the request body accurately—e.g., mapping form data to a CDT or dictionary—ensuring the API accepts the payload and returns the case code correctly. This is foundational to the integration’s functionality.
Conclusion: The two primary considerations are C (size limit of the body) and D (constructing a matching dictionary). These ensure the integration works reliably (C) and meets the API’s expectations (D), directly enabling the user to receive the case code at submission end. Size limits prevent technical failures, while the dictionary ensures data integrity—both are critical for a synchronous JSON POST in Appian. Option A could be relevant for performance but isn’t primary given the requirement, and B is irrelevant to the scenario.
Your application contains a process model that is scheduled to run daily at a certain time, which kicks off a user input task to a specified user on the 1st time zone for morning data collection. The time zone is set to the (default) pm!timezone. In this situation, what does the pm!timezone reflect?
Options:
The time zone of the server where Appian is installed.
The time zone of the user who most recently published the process model.
The default time zone for the environment as specified in the Administration Console.
The time zone of the user who is completing the input task.
Answer:
CExplanation:
Comprehensive and Detailed In-Depth Explanation:
In Appian, the pm!timezone variable is a process variable automatically available in process models, reflecting the time zone context for scheduled or time-based operations. Understanding its behavior is critical for scheduling tasks accurately, especially in scenarios like this where a process runs daily and assigns a user input task.
Option C (The default time zone for the environment as specified in the Administration Console):This is the correct answer. Per Appian’s Process Model documentation, when a process model uses pm!timezone and no custom time zone is explicitly set, it defaults to the environment’s time zone configured in the Administration Console (under System > Time Zone settings). For scheduled processes, such as one running “daily at a certain time,” Appian uses this default time zone to determine when the process triggers. In this case, the task assignment occurs based on the schedule, and pm!timezone reflects the environment’s setting, not the user’s location.
Option A (The time zone of the server where Appian is installed): This is incorrect. While the server’s time zone might influence underlying system operations, Appian abstracts this through the Administration Console’s time zone setting. The pm!timezone variable aligns with the configured environment time zone, not the raw server setting.
Option B (The time zone of the user who most recently published the process model): This is irrelevant. Publishing a process model does not tie pm!timezone to the publisher’s time zone. Appian’s scheduling is system-driven, not user-driven in this context.
Option D (The time zone of the user who is completing the input task): This is also incorrect. While Appian can adjust task display times in the user interface to the assigned user’s time zone (based on their profile settings), the pm!timezone in the process model reflects the environment’s default time zone for scheduling purposes, not the assignee’s.
For example, if the Administration Console is set to EST (Eastern Standard Time), the process will trigger daily at the specified time in EST, regardless of the assigned user’s location. The “1st time zone” phrasing in the question appears to be a typo or miscommunication, but it doesn’t change the fact that pm!timezone defaults to the environment setting.
You are designing a process that is anticipated to be executed multiple times a day. This process retrieves data from an external system and then calls various utility processes as needed. The main process will not use the results of the utility processes, and there are no user forms anywhere.
Which design choice should be used to start the utility processes and minimize the load on the execution engines?
Options:
Use the Start Process Smart Service to start the utility processes.
Start the utility processes via a subprocess synchronously.
Use Process Messaging to start the utility process.
Start the utility processes via a subprocess asynchronously.
Answer:
DExplanation:
Comprehensive and Detailed In-Depth Explanation:
As an Appian Lead Developer, designing a process that executes frequently (multiple times a day) and calls utility processes without using their results requires optimizing performance and minimizing load on Appian’s execution engines. The absence of user forms indicates a backend process, so user experience isn’t a concern—only engine efficiency matters. Let’s evaluate each option:
A. Use the Start Process Smart Service to start the utility processes:The Start Process Smart Service launches a new process instance independently, creating a separate process in the Work Queue. While functional, it increases engine load because each utility process runs as a distinct instance, consuming engine resources and potentially clogging the Java Work Queue, especially with frequent executions. Appian’s performance guidelines discourage unnecessary separate process instances for utility tasks, favoring integrated subprocesses, making this less optimal.
B. Start the utility processes via a subprocess synchronously:Synchronous subprocesses (e.g., a!startProcess with isAsync: false) execute within the main process flow, blocking until completion. For utility processes not used by the main process, this creates unnecessary delays, increasing execution time and engine load. With frequent daily executions, synchronous subprocesses could strain engines, especially if utility processes are slow or numerous. Appian’s documentation recommends asynchronous execution for non-dependent, non-blocking tasks, ruling this out.
C. Use Process Messaging to start the utility process:Process Messaging (e.g., sendMessage() in Appian) is used for inter-process communication, not for starting processes. It’s designed to pass data between running processes, not initiate new ones. Attempting to use it for starting utility processes would require additional setup (e.g., a listening process) and isn’t a standard or efficient method. Appian’s messaging features are for coordination, not process initiation, making this inappropriate.
D. Start the utility processes via a subprocess asynchronously:This is the best choice. Asynchronous subprocesses (e.g., a!startProcess with isAsync: true) execute independently of the main process, offloading work to the engine without blocking or delaying the parent process. Since the main process doesn’t use the utility process results and there are no user forms, asynchronous execution minimizes engine load by distributing tasks across time, reducing Work Queue pressure during frequent executions. Appian’s performance best practices recommend asynchronous subprocesses for non-dependent, utility tasks to optimize engine utilization, making this ideal for minimizing load.
Conclusion: Starting the utility processes via a subprocess asynchronously (D) minimizes engine load by allowing independent execution without blocking the main process, aligning with Appian’s performance optimization strategies for frequent, backend processes.
An existing integration is implemented in Appian. Its role is to send data for the main case and its related objects in a complex JSON to a REST API, to insert new information into an existing application. This integration was working well for a while. However, the customer highlighted one specific scenario where the integration failed in Production, and the API responded with a 500 Internal Error code. The project is in Post-Production Maintenance, and the customer needs your assistance. Which three steps should you take to troubleshoot the issue?
Options:
Send the same payload to the test API to ensure the issue is not related to the API environment.
Send a test case to the Production API to ensure the service is still up and running.
Analyze the behavior of subsequent calls to the Production API to ensure there is no global issue, and ask the customer to analyze the API logs to understand the nature of the issue.
Obtain the JSON sent to the API and validate that there is no difference between the expected JSON format and the sent one.
Ensure there were no network issues when the integration was sent.
Answer:
A, C, DExplanation:
Comprehensive and Detailed In-Depth Explanation:
As an Appian Lead Developer in a Post-Production Maintenance phase, troubleshooting a failed integration (HTTP 500 Internal Server Error) requires a systematic approach to isolate the root cause—whether it’s Appian-side, API-side, or environmental. A 500 error typically indicates an issue on the server (API) side, but the developer must confirm Appian’s contribution and collaborate with the customer. The goal is to select three steps that efficiently diagnose the specific scenario while adhering to Appian’s best practices. Let’s evaluate each option:
A. Send the same payload to the test API to ensure the issue is not related to the API environment:This is a critical step. Replicating the failure by sending the exact payload (from the failed Production call) to a test API environment helps determine if the issue is environment-specific (e.g., Production-only configuration) or inherent to the payload/API logic. Appian’s Integration troubleshooting guidelines recommend testing in a non-Production environment first to isolate variables. If the test API succeeds, the Production environment or API state is implicated; if it fails, the payload or API logic is suspect. This step leverages Appian’s Integration object logging (e.g., request/response capture) and is a standard diagnostic practice.
B. Send a test case to the Production API to ensure the service is still up and running:While verifying Production API availability is useful, sending an arbitrary test case risks further Production disruption during maintenance and may not replicate the specific scenario. A generic test might succeed (e.g., with simpler data), masking the issue tied to the complex JSON. Appian’s Post-Production guidelines discourage unnecessary Production interactions unless replicating the exact failure is controlled and justified. This step is less precise than analyzing existing behavior (C) and is not among the top three priorities.
C. Analyze the behavior of subsequent calls to the Production API to ensure there is no global issue, and ask the customer to analyze the API logs to understand the nature of the issue:This is essential. Reviewing subsequent Production calls (via Appian’s Integration logs or monitoring tools) checks if the 500 error is isolated or systemic (e.g., API outage). Since Appian can’t access API server logs, collaborating with the customer to review their logs is critical for a 500 error, which often stems from server-side exceptions (e.g., unhandled data). Appian Lead Developer training emphasizes partnership with API owners and using Appian’s Process History or Application Monitoring to correlate failures—making this a key troubleshooting step.
D. Obtain the JSON sent to the API and validate that there is no difference between the expected JSON format and the sent one:This is a foundational step. The complex JSON payload is central to the integration, and a 500 error could result from malformed data (e.g., missing fields, invalid types) that the API can’t process. In Appian, you can retrieve the sent JSON from the Integration object’s execution logs (if enabled) or Process Instance details. Comparing it against the API’s documented schema (e.g., via Postman or API specs) ensures Appian’s output aligns with expectations. Appian’s documentation stresses validating payloads as a first-line check for integration failures, especially in specific scenarios.
E. Ensure there were no network issues when the integration was sent:While network issues (e.g., timeouts, DNS failures) can cause integration errors, a 500 Internal Server Error indicates the request reached the API and triggered a server-side failure—not a network issue (which typically yields 503 or timeout errors). Appian’s Connected System logs can confirm HTTP status codes, and network checks (e.g., via IT teams) are secondary unless connectivity is suspected. This step is less relevant to the 500 error and lower priority than A, C, and D.
Conclusion: The three best steps are A (test API with same payload), C (analyze subsequent calls and customer logs), and D (validate JSON payload). These steps systematically isolate the issue—testing Appian’s output (D), ruling out environment-specific problems (A), and leveraging customer insights into the API failure (C). This aligns with Appian’s Post-Production Maintenance strategies: replicate safely, analyze logs, and validate data.
You need to design a complex Appian integration to call a RESTful API. The RESTful API will be used to update a case in a customer’s legacy system.
What are three prerequisites for designing the integration?
Options:
Define the HTTP method that the integration will use.
Understand the content of the expected body, including each field type and their limits.
Understand whether this integration will be used in an interface or in a process model.
Understand the different error codes managed by the API and the process of error handling in Appian.
Understand the business rules to be applied to ensure the business logic of the data.
Answer:
A, B, DExplanation:
Comprehensive and Detailed In-Depth Explanation:
As an Appian Lead Developer, designing a complex integration to a RESTful API for updating a case in a legacy system requires a structured approach to ensure reliability, performance, and alignment with business needs. The integration involves sending a JSON payload (implied by the context) and handling responses, so the focus is on technical and functional prerequisites. Let’s evaluate each option:
A. Define the HTTP method that the integration will use:This is a primary prerequisite. RESTful APIs use HTTP methods (e.g., POST, PUT, GET) to define the operation—here, updating a case likely requires PUT or POST. Appian’s Connected System and Integration objects require specifying the method to configure the HTTP request correctly. Understanding the API’s method ensures the integration aligns with its design, making this essential for design. Appian’s documentation emphasizes choosing the correct HTTP method as a foundational step.
B. Understand the content of the expected body, including each field type and their limits:This is also critical. The JSON payload for updating a case includes fields (e.g., text, dates, numbers), and the API expects a specific structure with field types (e.g., string, integer) and limits (e.g., max length, size constraints). In Appian, the Integration object requires a dictionary or CDT to construct the body, and mismatches (e.g., wrong types, exceeding limits) cause errors (e.g., 400 Bad Request). Appian’s best practices mandate understanding the API schema to ensure data compatibility, making this a key prerequisite.
C. Understand whether this integration will be used in an interface or in a process model:While knowing the context (interface vs. process model) is useful for design (e.g., synchronous vs. asynchronous calls), it’s not a prerequisite for the integration itself—it’s a usage consideration. Appian supports integrations in both contexts, and the integration’s design (e.g., HTTP method, body) remains the same. This is secondary to technical API details, so it’s not among the top three prerequisites.
D. Understand the different error codes managed by the API and the process of error handling in Appian:This is essential. RESTful APIs return HTTP status codes (e.g., 200 OK, 400 Bad Request, 500 Internal Server Error), and the customer’s API likely documents these for failure scenarios (e.g., invalid data, server issues). Appian’s Integration objects can handle errors via error mappings or process models, and understanding these codes ensures robust error handling (e.g., retry logic, user notifications). Appian’s documentation stresses error handling as a core design element for reliable integrations, making this a primary prerequisite.
E. Understand the business rules to be applied to ensure the business logic of the data:While business rules (e.g., validating case data before sending) are important for the overall application, they aren’t a prerequisite for designing the integration itself—they’re part of the application logic (e.g., process model or interface). The integration focuses on technical interaction with the API, not business validation, which can be handled separately in Appian. This is a secondary concern, not a core design requirement for the integration.
Conclusion: The three prerequisites are A (define the HTTP method), B (understand the body content and limits), and D (understand error codes and handling). These ensure the integration is technically sound, compatible with the API, and resilient to errors—critical for a complex RESTful API integration in Appian.
You are required to configure a connection so that Jira can inform Appian when specific tickets change (using a webhook). Which three required steps will allow you to connect both systems?
Options:
Create a Web API object and set up the correct security.
Configure the connection in Jira specifying the URL and credentials.
Create a new API Key and associate a service account.
Give the service account system administrator privileges.
Create an integration object from Appian to Jira to periodically check the ticket status.
Answer:
A, B, CExplanation:
Comprehensive and Detailed In-Depth Explanation:
Configuring a webhook connection from Jira to Appian requires setting up a mechanism for Jira to push ticket change notifications to Appian in real-time. This involves creating an endpoint in Appian to receive the webhook and configuring Jira to send the data. Appian’s Integration Best Practices and Web API documentation provide the framework for this process.
Option A (Create a Web API object and set up the correct security):This is a required step. In Appian, a Web API object serves as the endpoint to receive incoming webhook requests from Jira. You must define the API structure (e.g., HTTP method, input parameters) and configure security (e.g., basic authentication, API key, or OAuth) to validate incoming requests. Appian recommends using a service account with appropriate permissions to ensure secure access, aligning with the need for a controlled webhook receiver.
Option B (Configure the connection in Jira specifying the URL and credentials):This is essential. In Jira, you need to set up a webhook by providing the Appian Web API’s URL (e.g., https://
Option C (Create a new API Key and associate a service account):This is necessary for secure authentication. Appian recommends using an API key tied to a service account for webhook integrations. The service account should have permissions to process the incoming data (e.g., write to a process or data store) but not excessive privileges. This step complements the Web API security setup and Jira configuration.
Option D (Give the service account system administrator privileges):This is unnecessary and insecure. System administrator privileges grant broad access, which is overkill for a webhook integration. Appian’s security best practices advocate for least-privilege principles, limiting the service account to the specific objects or actions needed (e.g., executing the Web API).
Option E (Create an integration object from Appian to Jira to periodically check the ticket status):This is incorrect for a webhook scenario. Webhooks are push-based, where Jira notifies Appian of changes. Creating an integration object for periodic polling (pull-based) is a different approach and not required for the stated requirement of Jira informing Appian via webhook.
These three steps (A, B, C) establish a secure, functional webhook connection without introducing unnecessary complexity or security risks.
As part of an upcoming release of an application, a new nullable field is added to a table that contains customer data. The new field is used by a report in the upcoming release and is calculated using data from another table.
Which two actions should you consider when creating the script to add the new field?
Options:
Create a script that adds the field and leaves it null.
Create a rollback script that removes the field.
Create a script that adds the field and then populates it.
Create a rollback script that clears the data from the field.
Add a view that joins the customer data to the data used in calculation.
Answer:
B, CExplanation:
Comprehensive and Detailed In-Depth Explanation:
As an Appian Lead Developer, adding a new nullable field to a database table for an upcoming release requires careful planning to ensure data integrity, report functionality, and rollback capability. The field is used in a report and calculated from another table, so the script must handle both deployment and potential reversibility. Let’s evaluate each option:
A. Create a script that adds the field and leaves it null:Adding a nullable field and leaving it null is technically feasible (e.g., using ALTER TABLE ADD COLUMN in SQL), but it doesn’t address the report’s need for calculated data. Since the field is used in a report and calculated from another table, leaving it null risks incomplete or incorrect reporting until populated, delaying functionality. Appian’s data management best practices recommend populating data during deployment for immediate usability, making this insufficient as a standalone action.
B. Create a rollback script that removes the field:This is a critical action. In Appian, database changes (e.g., adding a field) must be reversible in case of deployment failure or rollback needs (e.g., during testing or PROD issues). A rollback script that removes the field (e.g., ALTER TABLE DROP COLUMN) ensures the database can return to its original state, minimizing risk. Appian’s deployment guidelines emphasize rollback scripts for schema changes, making this essential for safe releases.
C. Create a script that adds the field and then populates it:This is also essential. Since the field is nullable, calculated from another table, and used in a report, populating it during deployment ensures immediate functionality. The script can use SQL (e.g., UPDATE table SET new_field = (SELECT calculated_value FROM other_table WHERE condition)) to populate data, aligning with Appian’s data fabric principles for maintaining data consistency. Appian’s documentation recommends populating new fields during deployment for reporting accuracy, making this a key action.
D. Create a rollback script that clears the data from the field:Clearing data (e.g., UPDATE table SET new_field = NULL) is less effective than removing the field entirely. If the deployment fails, the field’s existence with null values could confuse reports or processes, requiring additional cleanup. Appian’s rollback strategies favor reverting schema changes completely (removing the field) rather than leaving it with nulls, making this less reliable and unnecessary compared to B.
E. Add a view that joins the customer data to the data used in calculation:Creating a view (e.g., CREATE VIEW customer_report AS SELECT ... FROM customer_table JOIN other_table ON ...) is useful for reporting but isn’t a prerequisite for adding the field. The scenario focuses on the field addition and population, not reporting structure. While a view could optimize queries, it’s a secondary step, not a primary action for the script itself. Appian’s data modeling best practices suggest views as post-deployment optimizations, not script requirements.
Conclusion: The two actions to consider are B (create a rollback script that removes the field) and C (create a script that adds the field and then populates it). These ensure the field is added with data for immediate report usability and provide a safe rollback option, aligning with Appian’s deployment and data management standards for schema changes.
You are on a protect with an application that has been deployed to Production and is live with users. The client wishes to increase the number of active users.
You need to conduct load testing to ensure Production can handle the increased usage
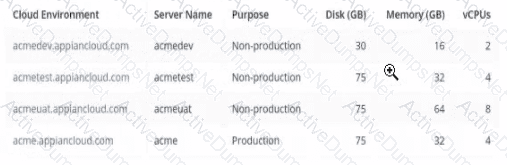
Review the specs for four environments in the following image.
Which environment should you use for load testing7
Options:
acmeuat
acmedev
acme
acmetest
Answer:
AExplanation:
The image provides the specifications for four environments in the Appian Cloud:
acmedev.appiancloud.com (acmedev): Non-production, Disk: 30 GB, Memory: 16 GB, vCPUs: 2
acmetest.appiancloud.com (acmetest): Non-production, Disk: 75 GB, Memory: 32 GB, vCPUs: 4
acmeuat.appiancloud.com (acmeuat): Non-production, Disk: 75 GB, Memory: 64 GB, vCPUs: 8
acme.appiancloud.com (acme): Production, Disk: 75 GB, Memory: 32 GB, vCPUs: 4
Load testing assesses an application’s performance under increased user load to ensure scalability and stability. Appian’s Performance Testing Guidelines emphasize using an environment that mirrors Production as closely as possible to obtain accurate results, while avoiding direct impact on live systems.
Option A (acmeuat):This is the best choice. The UAT (User Acceptance Testing) environment (acmeuat) has the highest resources (64 GB memory, 8 vCPUs) among the non-production environments, closely aligning with Production’s capabilities (32 GB memory, 4 vCPUs) but with greater capacity to handle simulated loads. UAT environments are designed to validate the application with real-world usage scenarios, making them ideal for load testing. The higher resources also allow testing beyond current Production limits to predict future scalability, meeting the client’s goal of increasing active users without risking live data.
Option B (acmedev):The development environment (acmedev) has the lowest resources (16 GB memory, 2 vCPUs), which is insufficient for load testing. It’s optimized for development, not performance simulation, and results would not reflect Production behavior accurately.
Option C (acme):The Production environment (acme) is live with users, and load testing here would disrupt service, violate Appian’s Production Safety Guidelines, and risk data integrity. It should never be used for testing.
Option D (acmetest):The test environment (acmetest) has moderate resources (32 GB memory, 4 vCPUs), matching Production’s memory and vCPUs. However, it’s typically used for SIT (System Integration Testing) and has less capacity than acmeuat. While viable, it’s less ideal than acmeuat for simulating higher user loads due to its resource constraints.
Appian recommends using a UAT environment for load testing when it closely mirrors Production and can handle simulated traffic, making acmeuat the optimal choice given its superior resources and non-production status.
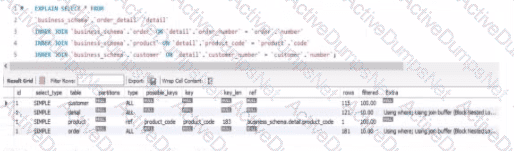
Review the following result of an explain statement:
Which two conclusions can you draw from this?
Options:
The request is good enough to support a high volume of data. but could demonstrate some limitations if the developer queries information related to the product
The worst join is the one between the table order_detail and order.
The join between the tables order_detail, order and customer needs to be tine-tuned due to indices.
The join between the tables 0rder_detail and product needs to be fine-tuned due to Indices
The worst join is the one between the table order_detail and customer
Answer:
C, DExplanation:
The provided image shows the result of an EXPLAIN SELECT * FROM ... query, which analyzes the execution plan for a SQL query joining tables order_detail, order, customer, and product from a business_schema. The key columns to evaluate are rows and filtered, which indicate the number of rows processed and the percentage of rows filtered by the query optimizer, respectively. The results are:
order_detail: 155 rows, 100.00% filtered
order: 122 rows, 100.00% filtered
customer: 121 rows, 100.00% filtered
product: 1 row, 100.00% filtered
The rows column reflects the estimated number of rows the MySQL optimizer expects to process for each table, while filtered indicates the efficiency of the index usage (100% filtered means no rows are excluded by the optimizer, suggesting poor index utilization or missing indices). According to Appian’s Database Performance Guidelines and MySQL optimization best practices, high row counts with 100% filtered values indicate that the joins are not leveraging indices effectively, leading to full table scans, which degrade performance—especially with large datasets.
Option C (The join between the tables order_detail, order, and customer needs to be fine-tuned due to indices):This is correct. The tables order_detail (155 rows), order (122 rows), and customer (121 rows) all show significant row counts with 100% filtering. This suggests that the joins between these tables (likely via foreign keys like order_number and customer_number) are not optimized. Fine-tuning requires adding or adjusting indices on the join columns (e.g., order_detail.order_number and order.order_number) to reduce the row scan size and improve query performance.
Option D (The join between the tables order_detail and product needs to be fine-tuned due to indices):This is also correct. The product table has only 1 row, but the 100% filtered value on order_detail (155 rows) indicates that the join (likely on product_code) is not using an index efficiently. Adding an index on order_detail.product_code would help the optimizer filter rows more effectively, reducing the performance impact as data volume grows.
Option A (The request is good enough to support a high volume of data, but could demonstrate some limitations if the developer queries information related to the product): This is partially misleading. The current plan shows inefficiencies across all joins, not just product-related queries. With 100% filtering on all tables, the query is unlikely to scale well with high data volumes without index optimization.
Option B (The worst join is the one between the table order_detail and order): There’s no clear evidence to single out this join as the worst. All joins show 100% filtering, and the row counts (155 and 122) are comparable to others, so this cannot be conclusively determined from the data.
Option E (The worst join is the one between the table order_detail and customer): Similarly, there’s no basis to designate this as the worst join. The row counts (155 and 121) and filtering (100%) are consistent with other joins, indicating a general indexing issue rather than a specific problematic join.
The conclusions focus on the need for index optimization across multiple joins, aligning with Appian’s emphasis on database tuning for integrated applications.
What are two advantages of having High Availability (HA) for Appian Cloud applications?
Options:
An Appian Cloud HA instance is composed of multiple active nodes running in different availability zones in different regions.
Data and transactions are continuously replicated across the active nodes to achieve redundancy and avoid single points of failure.
A typical Appian Cloud HA instance is composed of two active nodes.
In the event of a system failure, your Appian instance will be restored and available to your users in less than 15 minutes, having lost no more than the last 1 minute worth of data.
Answer:
B, DExplanation:
Comprehensive and Detailed In-Depth Explanation:
High Availability (HA) in Appian Cloud is designed to ensure that applications remain operational and data integrity is maintained even in the face of hardware failures, network issues, or other disruptions. Appian’s Cloud Architecture and HA documentation outline the benefits, focusing on redundancy, minimal downtime, and data protection. The question asks for two advantages, and the options must align with these core principles.
Option B (Data and transactions are continuously replicated across the active nodes to achieve redundancy and avoid single points of failure):This is a key advantage of HA. Appian Cloud HA instances use multiple active nodes to replicate data and transactions in real-time across the cluster. This redundancy ensures that if one node fails, others can take over without data loss, eliminating single points of failure. This is a fundamental feature of Appian’s HA setup, leveraging distributed architecture to enhance reliability, as detailed in the Appian Cloud High Availability Guide.
Option D (In the event of a system failure, your Appian instance will be restored and available to your users in less than 15 minutes, having lost no more than the last 1 minute worth of data):This is another significant advantage. Appian Cloud HA is engineered to provide rapid recovery and minimal data loss. The Service Level Agreement (SLA) and HA documentation specify that in the case of a failure, the system failover is designed to complete within a short timeframe (typically under 15 minutes), with data loss limited to the last minute due to synchronous replication. This ensures business continuity and meets stringent uptime and data integrity requirements.
Option A (An Appian Cloud HA instance is composed of multiple active nodes running in different availability zones in different regions):This is a description of the HA architecture rather than an advantage. While running nodes across different availability zones and regions enhances fault tolerance, the benefit is the resulting redundancy and availability, which are captured in Options B and D. This option is more about implementation than a direct user or operational advantage.
Option C (A typical Appian Cloud HA instance is composed of two active nodes):This is a factual statement about the architecture but not an advantage. The number of nodes (typically two or more, depending on configuration) is a design detail, not a benefit. The advantage lies in what this setup enables (e.g., redundancy and quick recovery), as covered by B and D.
The two advantages—continuous replication for redundancy (B) and fast recovery with minimal data loss (D)—reflect the primary value propositions of Appian Cloud HA, ensuring both operational resilience and data integrity for users.
You are running an inspection as part of the first deployment process from TEST to PROD. You receive a notice that one of your objects will not deploy because it is dependent on an object from an application owned by a separate team.
What should be your next step?
Options:
Create your own object with the same code base, replace the dependent object in the application, and deploy to PROD.
Halt the production deployment and contact the other team for guidance on promoting the object to PROD.
Check the dependencies of the necessary object. Deploy to PROD if there are few dependencies and it is low risk.
Push a functionally viable package to PROD without the dependencies, and plan the rest of the deployment accordingly with the other team’s constraints.
Answer:
BExplanation:
Comprehensive and Detailed In-Depth Explanation:
As an Appian Lead Developer, managing a deployment from TEST to PROD requires careful handling of dependencies, especially when objects from another team’s application are involved. The scenario describes a dependency issue during deployment, signaling a need for collaboration and governance. Let’s evaluate each option:
A. Create your own object with the same code base, replace the dependent object in the application, and deploy to PROD:This approach involves duplicating the object, which introduces redundancy, maintenance risks, and potential version control issues. It violates Appian’s governance principles, as objects should be owned and managed by their respective teams to ensure consistency and avoid conflicts. Appian’s deployment best practices discourage duplicating objects unless absolutely necessary, making this an unsustainable and risky solution.
B. Halt the production deployment and contact the other team for guidance on promoting the object to PROD:This is the correct step. When an object from another application (owned by a separate team) is a dependency, Appian’s deployment process requires coordination to ensure both applications’ objects are deployed in sync. Halting the deployment prevents partial deployments that could break functionality, and contacting the other team aligns with Appian’s collaboration and governance guidelines. The other team can provide the necessary object version, adjust their deployment timeline, or resolve the dependency, ensuring a stable PROD environment.
C. Check the dependencies of the necessary object. Deploy to PROD if there are few dependencies and it is low risk:This approach risks deploying an incomplete or unstable application if the dependency isn’t fully resolved. Even with “few dependencies” and “low risk,” deploying without the other team’s object could lead to runtime errors or broken functionality in PROD. Appian’s documentation emphasizes thorough dependency management during deployment, requiring all objects (including those from other applications) to be promoted together, making this risky and not recommended.
D. Push a functionally viable package to PROD without the dependencies, and plan the rest of the deployment accordingly with the other team’s constraints:Deploying without dependencies creates an incomplete solution, potentially leaving the application non-functional or unstable in PROD. Appian’s deployment process ensures all dependencies are included to maintain application integrity, and partial deployments are discouraged unless explicitly planned (e.g., phased rollouts). This option delays resolution and increases risk, contradicting Appian’s best practices for Production stability.
Conclusion: Halting the production deployment and contacting the other team for guidance (B) is the next step. It ensures proper collaboration, aligns with Appian’s governance model, and prevents deployment errors, providing a safe and effective resolution.
Unlock ACD301 Features
- ACD301 All Real Exam Questions
- ACD301 Exam easy to use and print PDF format
- Download Free ACD301 Demo (Try before Buy)
- Free Frequent Updates
- 100% Passing Guarantee by Activedumpsnet
Questions & Answers PDF Demo
- ACD301 All Real Exam Questions
- ACD301 Exam easy to use and print PDF format
- Download Free ACD301 Demo (Try before Buy)
- Free Frequent Updates
- 100% Passing Guarantee by Activedumpsnet